So, you learned how to say “Hello world” with Ruby on Rails and it’s time to move on since that app is not something you will use unless you are the only one survived on earth.
In this part of the tutorial you will get familiar with the following items.
- saving objects (from now on we will use the rails term model for these)
- the rails console
- using haml for your views
- using Twitter Bootstrap CSS to make your application look nice
You can find the complete code of the tutorial here.
Let’s start. Navigate to your workspaces directory from the command line and create the application:
rails new todo
Open the newly created directory todo with your favourite text editor (I use Sublime).
First, we will add the gems we will need. Open the Gemfile that is located at the root of the app’s directory and add the following lines:
gem 'haml'
gem 'bootstrap-sass', '~> 2.3.2.0'
gem 'simple_form'
and comment out the line:
gem ‘turbolinks’
adding a # at the beginning of the line (we won’t use this gem for now).
Also, open application.js which is located under app/assets/javascripts and remove the following line about turbolinks:
//= require turbolinks
If you “speak” Java, contents of the Gemfile are something like a classpath. You define which libraries you are going to use. Rails (bundler actually) is going to download and install these gems unless you already have them installed. We will do this now, from the command line:
cd todo
bundle install
Ok, let’s see if we are good so far. Start the server:
rails server
From your browser navigate to localhost:3000. Are we OK?

Yes, we are.
Open with your text editor the file database.yml which is located under the config directory:
config/database.yml
As you can see, the application has already been configured to use the SQLite database engine for persistence. This is ok for now but on an upcoming tutorial we are going to change this file in order to use MySQL.
Our application is going to have a single model, Task, with the following properties:
- title: task’s title
- note: task’s note (details etc)
- completed: task’s completion date
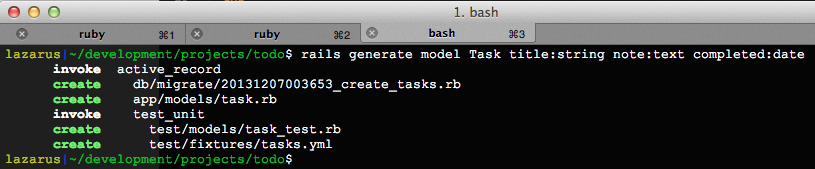
Let’s create the model. From the command line:
rails generate model Task title:string note:text completed:date
We decided to use:
- string for the title attribute (small data type)
- text for the note attribute (longer pieces of textual data)
- date for the completed attribute
From the command’s output, we are currently interested for the first two files:
-
db/migrate/xxxxxxxxxxxxxxxxx_create_tasks.rbThis is the migration. Migrations are files which change your database’s schema upon execution. This specific file has the appropriate commands that will create the table for our tasks. View the contents to get an idea of the commands. -
app/models/task.rbThis is the model. Models are classes defining persistent objects. This specific file defines our task model. If you open the file you will see that is actually an empty subclass of theActiveRecord::Base. We are going to add stuff there later on.
At this point we are going to get familiar with the rails console - your best friend while developing rails applications.
I suggest opening a new window/tab of the console application you’re using (I use iTerm2) so that you can have access to both the rails console and the shell prompt of our application’s root folder.
I have a third one for the rails server command.
From the command line:
rails console
or the equivalent
rails c
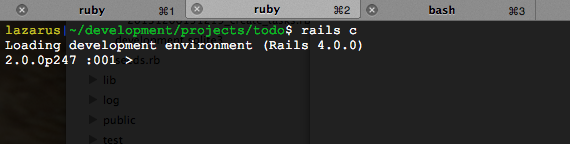
Imagine the rails console as an application in which you can directly execute your ruby code having all your application’s files available (and some of them already loaded).
Play a little with it, for example:

Don’t be scared by the example, read here.
Now, let’s check our Task model. Just type Task:

Hmmm.. Refresh your browser (at http:://localhost:3000).

That’s right. We generated the model migration but we didn’t ask to apply it so that our database schema gets updated.
Let’s do it now. From the command prompt:
rake db:migrate RAILS_ENV=development
Note: you may skip the RAILS_ENV=development part since this is the default.

Great. The table has been created. If you refresh your browser you’ll see the default rails application page again.
But re-typing Task in the rails console you’ll see that you get the same error.
This happens because your environment was loaded the moment you executed the command rails console and at that moment the table indeed didn’t exist.
You may reload the environment at any point using the command:
reload!
And there you have it:

Since our Task class is empty, what are all these properties? Where did they come from?
Well, ActiveRecord scans our table and automatically maps the column names to our model’s attributes. Cool? Cool.
As you may notice, there are two attributes there that we didn’t ask for: created_at and updated_at
There were added automatically by our model generation command and ActiveRecord automatically assigns values to these columns upon creation & updates of a model. Cool? Cool.
Let’s create our first task. Within the rails console:
Task.create(title: 'First task', note: 'This task was created inside the rails console')
That’s it. You just saved your first task. Now will load it in order to edit/update it and then to delete it.
task = Task.first

We loaded our task by selecting the first and only record of the Task model.
Let’s edit it:
task.title =  'First task - edited'
task.save

And let’s delete it:
task.destroy

Confirm that we have no tasks anymore.
Task.count

Ok, our model seems to be working fine. Time to start giving a face to our application.
The default views of a rails application are erb files that in the case of an html page you can imagine them as jsps but instead of Java you write ruby code.
We already have such a file in our application, application.html.erb, open it in your text editor to view its contents (it’s located under app/views/layouts).

This file is a layout meaning that you may use it to display content that you wish to be present to a lot (if not to all) of your application’s pages. Each page you create will be embedded at line 11.
You may add whatever you want before & after the yield directive.
As you can see, the file contains both static and dynamic content (enclosed in <%= %> tags) and looks very much like a jsp page. We are going to change this now by using haml.
Why? Because our views will look clearer and more beautiful. It will be easier to read and update them.
The haml’s general idea is:
- use indentation to express hierarchy skipping end tags etc
- ruby commands start with
- - ruby embedded content starts with
= - html tags start with
% - use
#for setting id’s to your html elements - use
.for setting css classes to your html elements
Now, rename the file to application.html.haml and replace the contents with the following:
!!!
%html
  %head
    %title Todo
    = stylesheet_link_tag    "application", media: "all"
    = javascript_include_tag "application"
    = csrf_meta_tags
  %body
    = yield

As you can see we also removed the turbolink related stuff.
IMPORTANT: Make sure to set your text editor to use 2 spaces instead of tabs!!!
Got it? Isn’t it simpler? You’ll see more haml code below that will help you understand it better but you may follow a simple tutorial later.
So, we will create our static pages controller now as we did at the previous tutorial. From the command line:
rails generate controller pages
Add a home action in the generated controller pages_controller.rb which is located under app/controllers:
class PagesController < ApplicationController
  def home
  end
end
Create the corresponding (empty) home page file home.html.haml under app/views/pages directory.
Remove the comments from the routes.rb file which is located under the config directory and add the following line in order to have our home page being rendered as the root path of the application:
root to: 'pages#home'

Refreshing your browser, you should now view an empty page (since our home.html.haml is empty).
But if you view the source of the page from your browser, you’ll see the html of our layout.

Let’s edit our layout to add some cool “bootstrapish” stuff.
We will add a hero unit with our application’s name. If we didn’t use haml, we would add something like:
<div class="row-fluid">
  <div class="span10 offset1">
    <div class="hero-unit">
      <h1>ToDo<h1>
      <p>Welcome to the tutorial's ToDo application</p>
    </div>
  </div>
</div>
The equivalent haml:
.row-fluid
  .span10.offset1
    .hero-unit.text-center
      %h1
        ToDo
      %p
        Welcome to the tutorial's ToDo application
So our application.haml.html now looks like:

In order to have the Boostrap magic enabled:
- rename the
application.cssfile which is located underapp/assets/stylesheetstoapplication.css.scss - add the following line to the bottom of the file:
@import 'bootstrap';
- in
application.jswhich is located underapp/assets/javascriptadd the following before the line//require_tree .//= require bootstrap
Done. Refresh your browser and you should see this:

Time to add some task functionality.
In our home action of the pages controller we will keep all of our tasks in an instance variable named @tasks:
def home
  @tasks = Task.all
end
and now we have them available to our view. We are going to show a table with all the tasks and an appropriate message if none exists. Add the following to your home.html.haml:
.container
  - if @tasks.empty?
    %span.text-warning There are no tasks!
  - else
    %table.table.table-hover.table-bordered
      %thead
        %tr
          %th Title
          %th Created at
          %th Completed
      %tbody
        - @tasks.each do |task|
          %tr
            %td
              %strong= task.title
            %td.text-info= task.created_at
            %td.text-success= task.completed
If you refresh you browser now, you should be seeing this:

Add a task as we did before via the rails console just to see how it is being displayed:

We created our pages controller in order to handle the static pages of the application. The “static” word here doesn’t mean static content but actions that do not belong in the context of a resource. This controller is described as a non-resourceful controller.
On the other hand, now, we need to create a controller for managing our model(resource) Task. We want this controller to handle actions (view, create, new, update & destroy) on our model. This kind of controllers is described as resourceful.
Rails helps us route these actions all at once with the resources method in our routes.rb file. By default, this method will route all available actions (see here) but we can limit them to our needs as you’ll see below. Add this line to routes.rb:
resources :tasks
Now, from the command line execute this command to view the current routes:
rake routes

As you can see, a bunch of new routes have been created besides our root one. Notice the forth column of them. These are the actions that are mapped because of the addition of the resources method in routes.rb.
We actually want all of them except the index since we are going to display our task index in the home page instead of a separate one. It’s pretty clear what the others are supposed to do. So, let’s remove the index action.
Change the resources call to the following:
resources :tasks, except: [:index]
Gone.

Also notice that the actions are supposed to belong to a tasks controller(tasks#action). Guess what’s next:
rails generate controller tasks
We created the tasks controller (app/controllers/tasks_controller.rb).
Now it’s time to describe what we want to do. On the home page, we want to have the list of our tasks giving the ability to update/destroy each of them. We also want to give the ability to create new tasks. We want all these actions to be executed the ajax way and not with redirects to new pages etc…
We will start with the tasks#new action. In the tasks controller:
def new
  @task = Task.new
end
Here we initialize a Task and we keep it at the @task instance variable. In our home action, we were rendering a whole page but now we want just a modal with a form inside it to be shown. We will respond with javascript to accomplish this so the corresponding view of the new action won’t be a new.html.haml but a new.js.erb one. Create it under app/views/tasks.
Before continuing, we will add a modal window in the home.html.haml so that it is be available in the page for our scripts to access it. Add the following line to the end of you the file:
#modal.modal.fade

Edit the new.js.erb and add the following:
m = $('#modal');
m.html('Foo');
m.modal('show');
We will correct the code above later but for the time being, let’s see how does the modal appear in our page.
We need to add a button/link in the home page for the new action. We can add it to the layout actually so it is available on all pages (even though we are going to have only the home page in this tutorial). Edit the application.html.haml file in your text editor and add the following line in the hero unit:
= link_to 'New task', new_task_path, class: 'btn btn-primary'

Now refresh your page in the browser:

Nice. Press the button.

Hmmm.. Error… Missing template…
What happened here since we have a view for the new action? In simple words, normal clicks of links are requesting the html format of our views. We have to request the js format and to do so change the link we added to the layout as below:
= link_to 'New task', new_task_path, class: 'btn btn-primary', remote: true
If you press the button now, you will see a modal with the word Foo as its content.
Before continuing, you should know what a partial is: a re-usable part of code (imagine it as a part of a view) which you may embed into other partials/pages/layouts etc. So, if we have a part of a view that we want to use to other places too, we usually create a partial.
In our case, we will create a partial that will be our form for creating a task. Then, in our new.js.erb we are going to replace the Foo string with this partial so the modal will display the Task form.
Partial files start with an underscore so create a file named _task_form.html.haml under app/views/tasks directory and add the following contents:
.modal-header
  %h1 New Task
= simple_form_for task, class: 'clearfix' do |f|
  .modal-body
    = f.input :title
    = f.input :note
    = f.input :completed
  .modal-footer
    = f.submit 'Save', class: 'btn btn-primary'
Also, open the page.css.scss file which is under app/assets/stylesheets and add the following rule to fix the bottom margin of the form displayed in a modal:
.modal form {
  margin-bottom: 0;
}
Finally, let’s change the new.js.erb in order to render the partial in the modal:
m = $('#modal');
m.html('<%= j(render partial: 'task_form', locals: {task: @task}) %>');
m.modal('show');
And now we can press the button New task:

As you can see, simple_form picked to render the title as a simple input text, note as a textarea and, well, the completed date field as a combination of three selects. Let’s change the last one because it doesn’t look nice.
To achieve this we will tell simple_form to render it as a simple text field, then we will add a specific class to this input and using javascript we are going to create a nice calendar.
First change the line of the task form from:
= f.input :completed
to
= f.input :completed, as: :string, input_html: {class: 'datepicker'}
We will need a new gem, so add it to the end of your Gemfile:
gem 'bootstrap-datepicker-rails'
Edit application.css.scss which is under app/assets/stylesheets and add the following before line *= require_tree .
*= require bootstrap-datepicker
Edit application.js and add the following before line *//= require_tree .*
//= require bootstrap-datepicker
Now, we have to create a javascript function that will apply the datepicker behaviour of the gem to the appropriate inputs. We’ll do this in a fancy way. Open the pages.js.coffee file and add the following:
$.fn.extend {
  integrateDatepicker: (selector)->
    selector = selector || '.datepicker'
    $(@).find(selector).datepicker()
}
$(document).ready () ->
  $('body').integrateDatepicker()
What did we do here?
We extended the jQuery prototype in order to add a function (integrateDatepicker) that will search the children of the current element with a given selector and apply the datepicker behaviour on them.
We also call this function when the document is ready on the body in order to avoid the explicit call on freshly rendered pages.
Now, since our form was not present during the ready callback of the document, the behaviour hasn’t been added to our completed input. Thus, we must add the following line at the end of the new.js.erb:
$('#modal').integrateDatepicker();
Refresh and there it is:

Since this form was created for the @task instance variable of the controller and since that @task does not exist but it is a new one, its action (the form’s action) has automatically been resolved to the create action of the controller. Don’t believe me? Press the save button:

Open the tasks controller and add the following:
def create
  @task = Task.create(task_params)
  redirect_to root_path
end
private
def task_params
  params.require(:task).permit(:title, :note, :completed)
end
Here we defined the create action that creates the task and then redirects to the root path aka our home page.
We also created the task_params private method so that we filter the params of the request in case someone tries to pass parameters that we don’t expect.
We only allow values for the title, note and completed attributes of our model. There will be cases that your model will have attributes you don’t want to be set by the user and this is the way to control them.

It’s about time to end this part of the tutorial here. Very soon I will write the next part in which we will:
- refactor the
createaction so that it doesn’t redirect to the root path but it closes the modal and re-renders the table of the tasks - add validation to our model so that empty titles are not allowed for the tasks showing the appropriate messages to the user
- implement the edit/update and delete functionality
 (
(