Lately I was experimenting with GTK and its Ruby bindings and I decided to write a tutorial introducing this functionality. In this post we are going to create a simple ToDo application (something like what we created here with Ruby on Rails) using the gtk3 gem a.k.a. the GTK+ Ruby bindings.
Note: The code of the tutorial is available at GitHub.
What is GTK+
Quoting the toolkit’s page:
GTK+, or the GIMP Toolkit, is a multi-platform toolkit for creating graphical user interfaces. Offering a complete set of widgets, GTK+ is suitable for projects ranging from small one-off tools to complete application suites.
..and about its creation:
GTK+ was initially developed for and used by the GIMP, the GNU Image Manipulation Program. It is called the “The GIMP ToolKit” so that the origins of the project are remembered. Today it is more commonly known as GTK+ for short and is used by a large number of applications including the GNU project’s GNOME desktop.
Prerequisites
GTK+ version
Make sure you have GTK+ installed.
The OS in which I developed the tutorial’s application is Ubuntu 16.04 which has GTK+ installed by default (version: 3.18).
You can check yours with the following command:
dpkg -l libgtk-3-0
Ruby
You should have ruby installed on your system. I use RVM to manage multiple ruby versions installed on my system. If you want to go with that too, you can find instructions for installing the tool in its homepage and for installing ruby versions (a.k.a. rubies) the related documentation page.
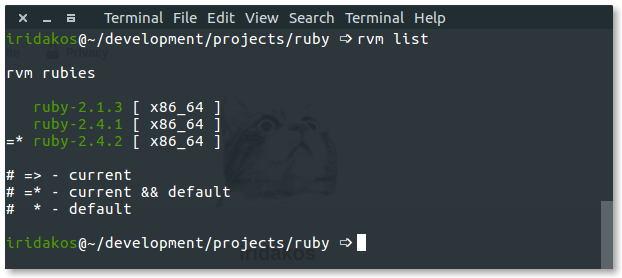
This tutorial is using Ruby 2.4.2. You can check yours using: ruby --version or via RVM with rvm list.
Glade
Again, quoting the tool’s page
Glade is a RAD tool to enable quick & easy development of user interfaces for the GTK+ toolkit and the GNOME desktop environment
We will use Glade to design the user interface of our application.
If you are on Ubuntu, install glade with:
sudo apt install glade
gtk3 gem
This gem provides the Ruby bindings for the GTK+ toolkit. In other words, it allows us to talk to the GTK+ API using the Ruby language.
Install the gem via:
gem install gtk3
The application specs
We will build an application that:
- it will have a user interface (desktop application)
- it will allow users to set miscellaneous properties to each item (such as priority)
- it will allow users to create and edit ToDo items
- all items will be saved as files in the user’s home directory in a folder named
.gtk-todo-tutorial
- all items will be saved as files in the user’s home directory in a folder named
- it will allow users to archive ToDo items
- archived items should be put in their own folder
archived
- archived items should be put in their own folder
The application structure
gtk-todo-tutorial # root directory
  |-- application
    |-- ui # everything related to the ui of the application
    |-- models # our models
    |-- lib # the directory to host any utilities we might need
  |-- resources # directory to host the resources of our application
  gtk-todo # the executable that will start our application
Let’s start!
Building the ToDo application
Initializing the application
Create a directory in which we will save all files that the application will need. As shown in the section above, I named mine gtk-todo-tutorial.
In there create a file named gtk-todo (that’s right, no extension) and add the following:
#!/usr/bin/env ruby

require 'gtk3'

app = Gtk::Application.new 'com.iridakos.gtk-todo', :flags_none

app.signal_connect :activate do |application|
  window = Gtk::ApplicationWindow.new(application)
  window.set_title 'Hello GTK+Ruby!'
  window.present
end

puts app.run
This is going to be the script that will start the application.
Note the shebang in the first line. This is how we define which interpreter must be used to execute the script under UNIX/Linux operating systems. This way, we don’t have to use ruby gtk-todo but just the script’s name gtk-todo.
Don’t try it yet though because we haven’t changed the mode of the file so as to be executable. To do so, type the following command in a terminal after navigating to the application’s root directory:
chmod +x ./gtk-todo # make the script executable
Now from the console execute:
./gtk-todo # execute the script
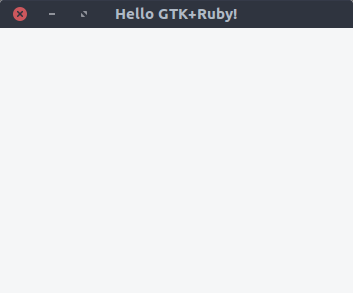
Ta daaaaaa
Notes
-
The application object we defined above and all of the GTK+ widgets in general, emit signals to trigger events. Once an application starts running for example, it emits a signal to trigger the
activateevent. All we have to do is to define what we want to happen when this signal is emitted. We accomplished this by using thesignal_connectinstance method and passing it a block whose code will be executed upon the given event. We will be doing this a lot throughout the tutorial. -
When we initialized the
Gtk::Applicationobject we passed two parameters:com.iridakos.gtk-todo: this is our application’s id and in general it should be a reverse DNS style identifier. For more information about its usage and best practices check here.:flags_none: this is a flag defining the behavior of the application. In our case, we used the default behavior. Check here all the flags and the type of applications they define. You can use the Ruby equivalent flags as defined inGio::ApplicationFlags.constants. For example, instead of using the:flags_nonewe could instead useGio::ApplicationFlags::FLAGS_NONE
Suppose the application object we previously created (Gtk::Application) had a lot of things to do when the activate signal was emitted or that we wanted to connect to more signals. We would end up creating a huge gtk-todo script file making it hard to read/maintain. Time to refactor.
As described in the The application structure section, create a folder named application along with its sub-folders ui, models and lib.
- In the
uifolder we will place all files related to our user interface. - In the
modelsfolder we will place all files related to our models. - In the
libfolder we will place all other files that don’t belong to either of the aforementioned folders.
We are going to define a new subclass of the Gtk::Application class for our application. Create a file named application.rb under application/ui/todo with the following contents.
module ToDo
  class Application < Gtk::Application
    def initialize
      super 'com.iridakos.gtk-todo', Gio::ApplicationFlags::FLAGS_NONE

      signal_connect :activate do |application|
        window = Gtk::ApplicationWindow.new(application)
        window.set_title 'Hello GTK+Ruby!'
        window.present
      end
    end
  end
end
and change the gtk-todo script accordingly:
#!/usr/bin/env ruby

require 'gtk3'

app = ToDo::Application.new

puts app.run
Much cleaner, isn’t it? Yeah, but it doesn’t work. You should be getting something like:
./gtk-todo:5:in `<main>': uninitialized constant ToDo (NameError)
The problem is that we haven’t required any of the ruby files placed in the application folder.
Change the script file as follows and execute it again.
#!/usr/bin/env ruby

require 'gtk3'

# Require all ruby files in the application folder recursively
application_root_path = File.expand_path(__dir__)
Dir[File.join(application_root_path, '**', '*.rb')].each { |file| require file }

app = ToDo::Application.new

puts app.run
You should be fine.
Resources
At the beginning of this tutorial we said that we would use Glade to design the user interface of the application. Glade actually produces xml files with the appropriate elements and attributes that reflect what we designed via its user interface. We somehow need to make use of these files so that our application gets the UI we designed.
These files are resources for the application and the GResource API provides a way for packing them all together in a binary file and afterwards accessing them from inside the application with advantages as opposed to manually having to deal with already loaded resources, their location on the file system etc. Read more about the API here.
Describing the resources
First, we need to create a file describing the resources of the application. Create a file named gresources.xml and place it directly under the resources folder.
<?xml version="1.0" encoding="UTF-8"?>
<gresources>
  <gresource prefix="/com/iridakos/gtk-todo">
    <file preprocess="xml-stripblanks">ui/application_window.ui</file>
  </gresource>
</gresources>
In this “description” we actually say: we have a resource which is located under the ui directory (relative to this xml file) with name application_window.ui. Before loading this resource please remove the blanks. Thanks. Of course this is not going to work now since we haven’t created the resource via Glade yet. Don’t worry though, one thing at a time.
Note: the xml-stripblanks directive will use the xmllint command to remove the blanks. In Ubuntu you have to install the package libxml2-utils to obtain it.
Building the resources binary file
In order to produce the binary resources file, we are going to use another utility of the GLib library called glib-compile-resources. Check if you have it installed with dpkg -l libglib2.0-bin. You should be seeing something like this:
ii libglib2.0-bin 2.48.2-0ubuntu amd64 Programs for the GLib library
If not, then install the package (sudo apt install libglib2.0-bin in Ubuntu).
Let’s build the file. We will add the code in our script so that the resources are getting built every time we execute it.
Change the gtk-todo script as follows.
#!/usr/bin/env ruby

require 'gtk3'
require 'fileutils'

# Require all ruby files in the application folder recursively
application_root_path = File.expand_path(__dir__)
Dir[File.join(application_root_path, '**', '*.rb')].each { |file| require file }

# Define the source & target files of the glib-compile-resources command
resource_xml = File.join(application_root_path, 'resources', 'gresources.xml')
resource_bin = File.join(application_root_path, 'gresource.bin')

# Build the binary
system("glib-compile-resources",
       "--target", resource_bin,
       "--sourcedir", File.dirname(resource_xml),
       resource_xml)

at_exit do
  # Before existing, please remove the binary we produced, thanks.
  FileUtils.rm_f(resource_bin)
end

app = ToDo::Application.new
puts app.run
and execute it. This happens in the console and it’s fine, we’ll fix it later on:
/.../gtk-todo-tutorial/resources/gresources.xml: Failed to locate 'ui/application_window.ui' in any source directory.
What we did:
- added a
requirestatement for thefileutilslibrary so that we can use it in theat_exitcall - defined the source and target files of the
glib-compile-resourcescommand - executed the
glib-compile-resourcescommand - set a hook so that before exiting the script (before the application exits) the binary file gets deleted so next time it gets build again
Loading the resources binary file
Ok, we described the resources, we packed them in a binary file. Now we have to load them and register them in the application so that we can use them.
This is so easy as adding the following two lines before the at_exit hook.
resource = Gio::Resource.load(resource_bin)
Gio::Resources.register(resource)
That’s it. From now on, we are able to use the resources from anywhere inside the application (we’ll see how later on). Well now the script fails since it can’t load the binary which is not produced but…be patient, we are going to get to the interesting part soon. Actually now.
Designing the main application window
Introducing glade
Open glade.
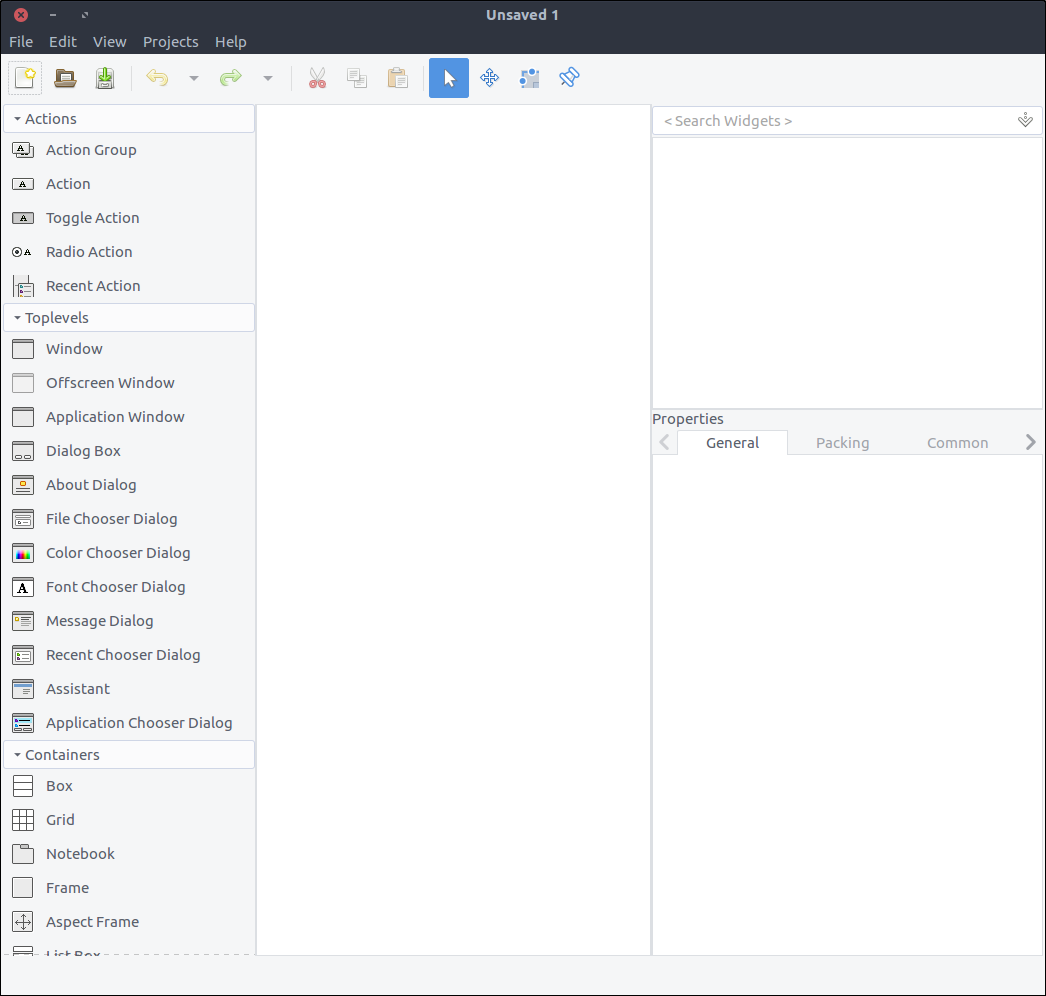
A quick description of what you see.
- On the left section there is a list of widgets which you can drag and drop in the middle section given that a widget can be placed there. For example, you can’t add a top level window inside a label widget. I will be calling this as the Widget section from now on.
- On the middle section you see your widgets as they will appear (most of the times) in the application. I will be calling this as the Design section from now on.
- On the right section there are two subsections:
- the top section contains the hierarchy of the widgets as added to the resource. I will be calling this as the Hierarchy section from now on.
- the bottom section contains all the properties that you can configure via Glade for a given selected widget of the aforementioned top section. I will be calling this as the Properties section from now on.
I will try to describe the steps for building this tutorial’s UI using Glade but if you are interested in building GTK+ applications you should take a look at the resources & tutorials for using the tool on the official page.
Create the application window design
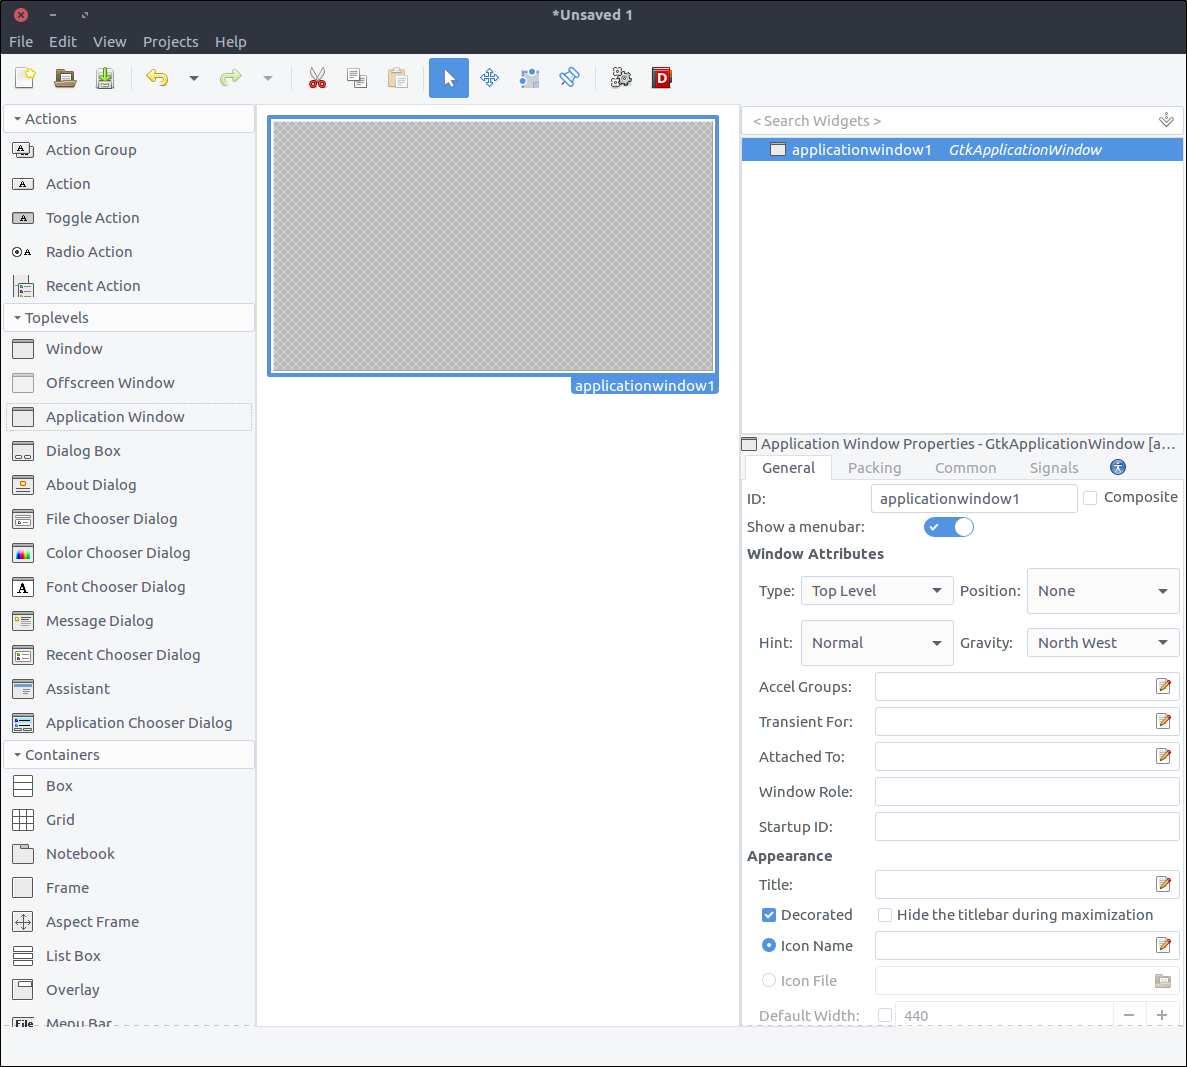
We are going to create the application window. As you can guess, all we have to do is drag the widget ‘Application Window’ from the widget section to the design section.
Gtk::Builder is an object used in GTK+ applications to read textual descriptions of a user interface (like the one we will build via Glade) and build the described objects-widgets.
In the properties section, the first property is the ID and it has a default value applicationWindow1. If we let this property as is, then later on, through our code we would create a Gtk::Builder that would load the file produced by glade and in order to obtain the application window we would have to use something line:
application_window = builder.get_object('applicationWindow1')

application_window.signal_connect 'whatever' do |a,b|
...
The application_window object would be of class Gtk::ApplicationWindow and thus whatever we had to add to its behavior (like setting its title) would take place out of the original class. Also, as shown in the snippet above, the code to connect to a signal of the window would be placed inside the file that instantiated it.
Good news though, a GTK+ feature introduced in 2013 allows the creation of composite widget templates which among other advantages allows as to define the custom class for the widget (which eventually derives from an existing GTK::Widget class in general). Don’t worry if you are confused. You are going to understand what is going on after we write some code and view the results.
Now, in order to define our design as a template, check the Composite checkbox in the property widget. Note that the ID property changed to Class Name. Fill in there TodoApplicationWindow. This is the class we are going to create in our code to represent this widget.
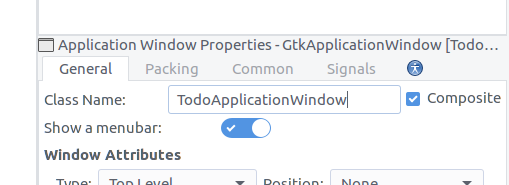
Save the file with name application_window.ui in a new folder named ui inside the resources. If you open the file from an editor you will see this:
<?xml version="1.0" encoding="UTF-8"?>
<!-- Generated with glade 3.18.3 -->
<interface>
  <requires lib="gtk+" version="3.12"/>
  <template class="TodoApplicationWindow" parent="GtkApplicationWindow">
    <property name="can_focus">False</property>
    <child>
      <placeholder/>
    </child>
  </template>
</interface>
As you can see, our widget has a class and parent attribute. Following the parent class attribute convention, obviously, our class has to be defined inside a module named Todo. Before getting there, let’s try to start the application by executing the script (./gtk-todo).
Yeah! It starts!
Create the application window class
While running the application, if you check the contents of the application’s root directory you can see the gresource.bin file there. Even though the application starts successfully because the resource bin is present and it can register it, we do not use it yet. We still initiate an ordinary Gtk::ApplicationWindow in our application.rb file and that all we show. Time to create our custom application window class.
Create a file named application_window.rb, place it under application/ui/todo folder and add the following content.
module Todo
  class ApplicationWindow < Gtk::ApplicationWindow
    # Register the class in the GLib world
    type_register

    class << self
      def init
        # Set the template from the resources binary
        set_template resource: '/com/iridakos/gtk-todo/ui/application_window.ui'
      end
    end

    def initialize(application)
      super application: application

      set_title 'GTK+ Simple ToDo'
    end
  end
end
We defined the init method as a singleton method on the class after opening the eigenclass in order to bind the template of this widget to the previously registered resource file.
Before that, we called the type_register class method which registers and make available our custom widget class to the GLib world.
Finally, each time we create an instance of this window, we set its title to GTK+ Simple ToDo.
Now, let’s go back to the application.rb file and use what we just implemented:
module ToDo
  class Application < Gtk::Application
    def initialize
      super 'com.iridakos.gtk-todo', Gio::ApplicationFlags::FLAGS_NONE

      signal_connect :activate do |application|
        window = Todo::ApplicationWindow.new(application)
        window.present
      end
    end
  end
end
Execute the script.
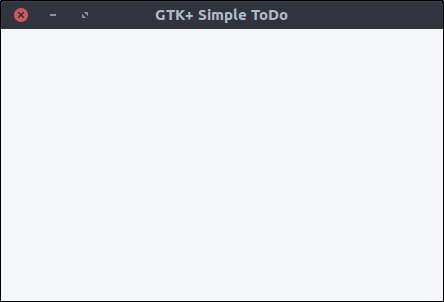
Define the model
For simplicity, we are going to save the ToDo items in files in json format under a dedicated hidden folder in user’s home directory. Of course, in a real life application we would use a database but this is out of the scope of this tutorial.
Our Todo::Item model will have the following properties:
- id: the id of the item
- title: the title
- notes: any notes
- priority: its priority
- creation_datetime: the date & time the item was created
- filename: the name of the file that an item is saved to
Create a file named item.rb under the application/models directory, with contents:
require 'securerandom'
require 'json'

module Todo
  class Item
    PROPERTIES = [:id, :title, :notes, :priority, :filename, :creation_datetime].freeze

    PRIORITIES = ['high', 'medium', 'normal', 'low'].freeze

    attr_accessor *PROPERTIES

    def initialize(options = {})
      if user_data_path = options[:user_data_path]
        # New item. When saved, it will be placed under the :user_data_path value
        @id = SecureRandom.uuid
        @creation_datetime = Time.now.to_s
        @filename = "#{user_data_path}/#{id}.json"
      elsif filename = options[:filename]
        # Load an existing item
        load_from_file filename
      else
        raise ArgumentError, 'Please specify the :user_data_path for new item or the :filename to load existing'
      end
    end

    # Loads an item from a file
    def load_from_file(filename)
      properties = JSON.parse(File.read(filename))

      # Assign the properties
      PROPERTIES.each do |property|
        self.send "#{property}=", properties[property.to_s]
      end
    rescue => e
      raise ArgumentError, "Failed to load existing item: #{e.message}"
    end

    # Resolves if an item is new
    def is_new?
      !File.exists? @filename
    end

    # Saves an item to its `filename` location
    def save!
      File.open(@filename, 'w') do |file|
        file.write self.to_json
      end
    end

    # Deletes an item
    def delete!
      raise 'Item is not saved!' if is_new?

      File.delete(@filename)
    end

    # Produces a json string for the item
    def to_json
      result = {}
      PROPERTIES.each do |prop|
        result[prop] = self.send prop
      end

      result.to_json
    end
  end
end
As you can see, we defined methods to:
- initialize an item
- as new by defining the
:user_data_pathin which it will be saved later on - as existing by defining the
:filenameto be loaded from. The filename must be a json file previously generated by an item
- as new by defining the
- load an item from a file
- resolve whether an items is new or not (saved at least once in the
:user_data_pathor not) - save an item by writing its json string to a file
- delete an item
- produce the json string of an item as a hash of its properties
Add a new item
Create the button
Let’s add a button to our application window for adding a new item. Open the resources/ui/application_window.ui file in glade.
- Drag a
Buttonfrom the widget section to the design section. - In the properties section, set its ID value to
add_new_item_button. - Near the bottom of the General tab in the properties section there’s a text area just below the Label with optional image option. Change its value from button to Add new item
- Save the file and execute the script

Don’t worry, we will improve the design later on. Now, let’s see how to connect functionality to our button’s clicked event.
First, we have to update our application window class so that it learns about its new child, the button with id add_new_item_button. Then, we can access the child to alter its behavior.
Change the init method as follows:
def init
  # Set the template from the resources binary
  set_template resource: '/com/iridakos/gtk-todo/ui/application_window.ui'

  bind_template_child 'add_new_item_button'
end
Pretty simple, right? The bind_template_child method does exactly what it says and from now on every instance of our Todo::ApplicationWindow class will have an add_new_item_button method to access the related button. So, let’s alter the initialize method as follows.
def initialize(application)
  super application: application

  set_title 'GTK+ Simple ToDo'

  add_new_item_button.signal_connect 'clicked' do |button, application|
    puts "OMG! I AM CLICKED"
  end
end
As you can see, we access the button by the add_new_item_button method and we define what we want to take place when clicked. Restart the application and try clicking it. In the console you should see the message OMG! I AM CLICKED every time you click the button.
What we want though to happen when we click this button is to show a new window through which we will save a ToDo item. You guessed right. Glade o’clock.
Create the new item window
- Create a new project in Glade by pressing the most left icon of the top bar or by selecting File > New from the application menu.
- Drag a
Windowfrom the widget section to the design area. - Check its
Compositeproperty and name the classTodoNewItemWindow.
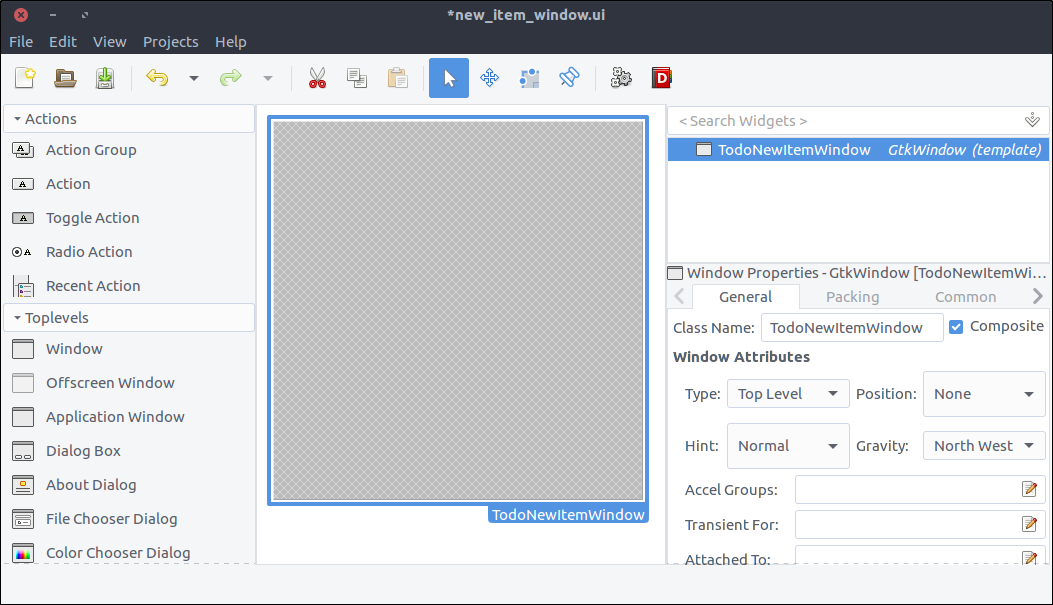
- Drag a
Gridfrom the widget section and place it in the window we added in the previous steps. - Set its rows number to 5 and its columns number to 2 in the window that popped up.
- In the General tab of its properties window, set its Rows spacing and Columns spacing to 10 (the numbers are in pixels).
- In the Common tab of the properties section, set the
Widget Spacing > Margins > Top, Bottom, Left, Rightall to 10 so that the contents are not stuck to the borders of the window.
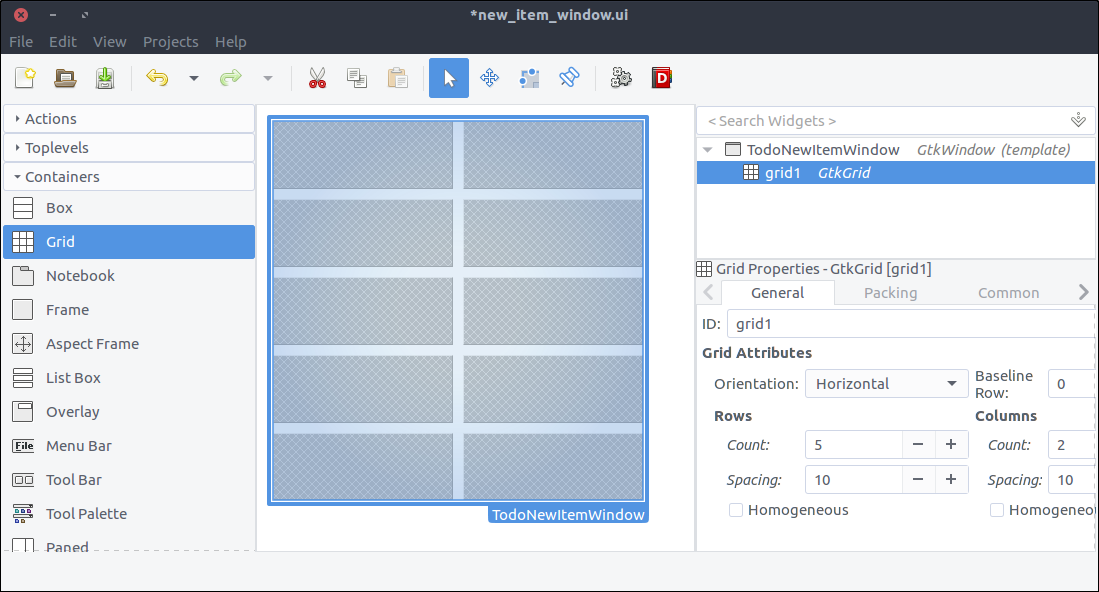
- Drag four times a
Labelwidget from the widget section and place them in each row of theGrid. - Change their
Labelproperty from top to bottom as:Id:Title:Notes:Priority:
- In the General tab of the properties section, change the Alignment and Padding > Alignment > Horizontal property from 0.50 to 1 for each property. This will align the label text on the right.
- This step is optional but I suggest that you do it: We will not bind these labels in our window since we don’t need to alter their state or behavior. So in this context, we don’t need to set a descriptive id for each of them like we did for the
add_new_item_buttonbutton in the application window. BUT. We are going to add more elements to our design and the hierarchy of the widgets in Glade will be hard to read with all thelabel1.label2. So set a descriptive id to each to make our lives easier (likeid_label,title_label,notes_label,priority_label). I even set the grid’s id tomain_gridcause I don’t like seeing numbers in ids or variable names :)
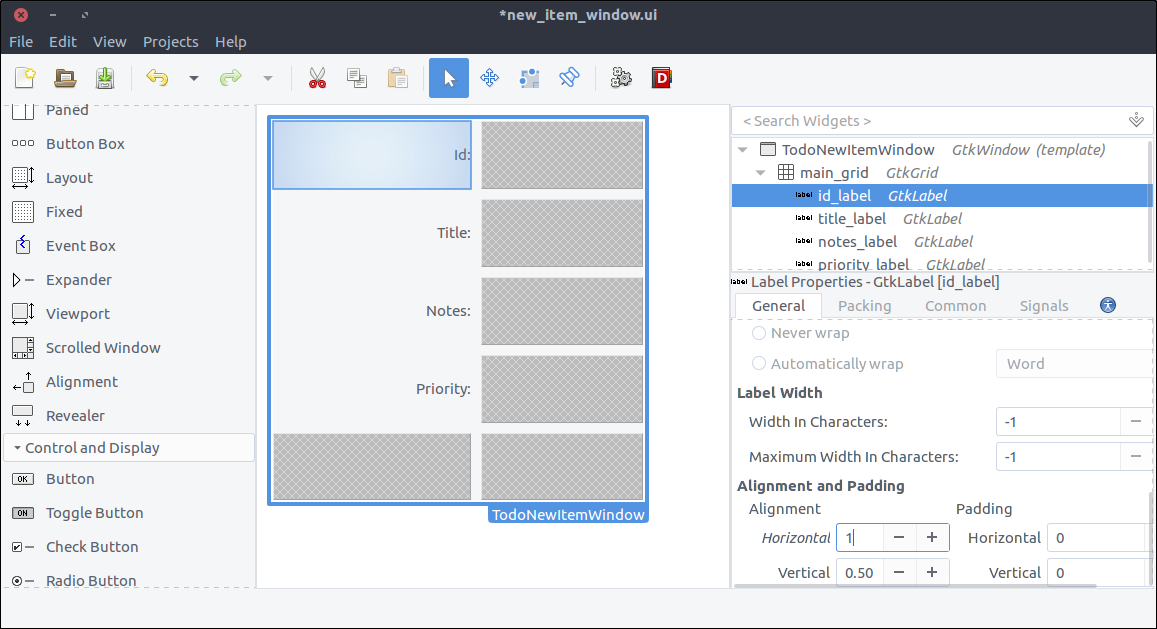
- Drag a
Labelfrom the widget section to the second column of the grid’s first row. The id is automatically generated by our model thus we won’t allow editing so a label to display it is more than enough. - Set the
IDproperty toid_value_label. - Set the Alignment and Padding > Alignment > Horizontal property to 0 so that the text aligns on the left.
- We are going to bind this widget to our window class so that we can change its text each time we load the window so setting a label through glade is not needed but doing so makes the design look closer to what it’ll look like when rendered with actual data. So you can optionally set a label here to whatever suits you better. I set mine to
id-of-the-todo-item-here.
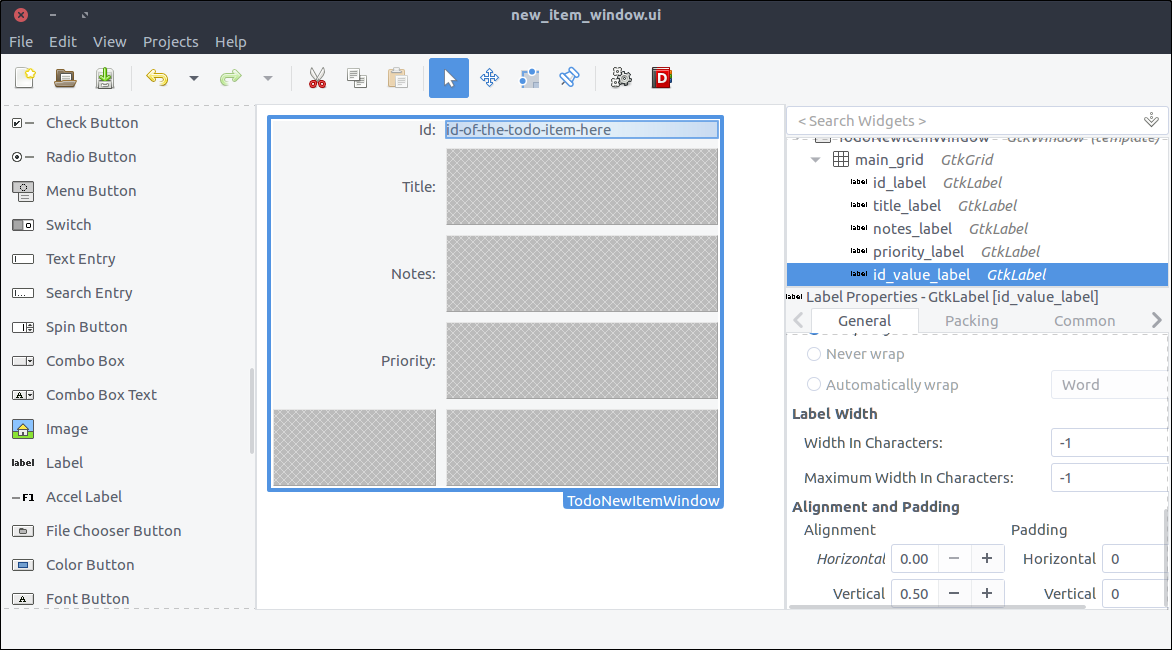
- Drag a
Text Entryfrom the widget section to the second column of the second row of the grid. - Set its ‘ID’ property to
title_text_entry. As you may have noticed, I prefer obtaining the widget type in the id so that the code in the class becomes more readable later on. - In the Common tab of the properties section, check the
Widget Spacing > Expand > Horizontalcheckbox and turn on the switch which is right next to it. This way, the widget will expand horizontally every time its parent (a.k.a. the grid) is resized.
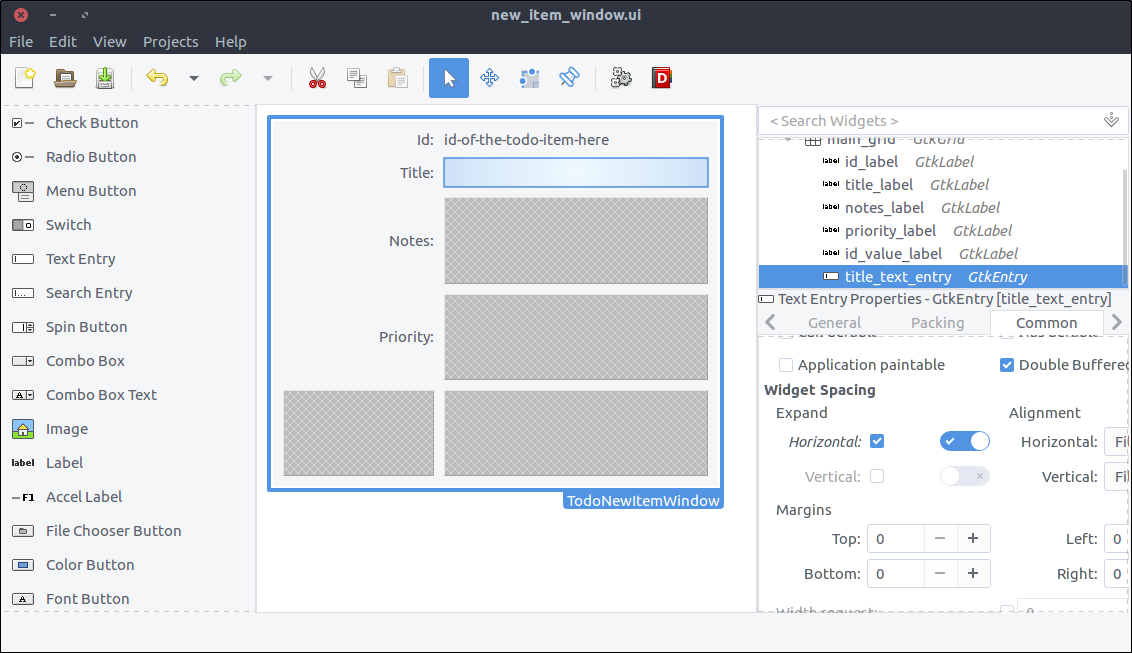
- Drag a
Text Viewfrom the widget section to the second column of the third row of the grid. - Set its
IDtonotes. Nope, just testing you. Set itsIDproperty tonotes_text_view. - In the Common tab of the properties section, check the
Widget Spacing > Expand > Horizontal, Verticalcheckboxes and turn on the switches which are right next to them. This way, the widget will expand horizontally and vertically every time its parent (a.k.a. the grid) is resized.
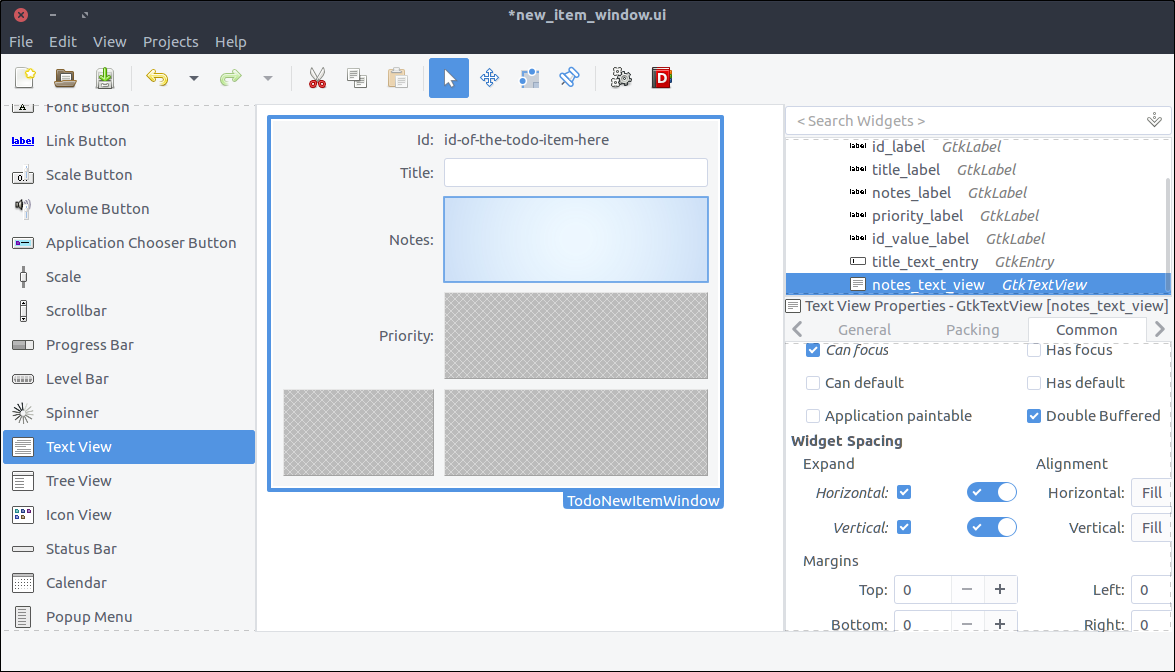
- Drag a
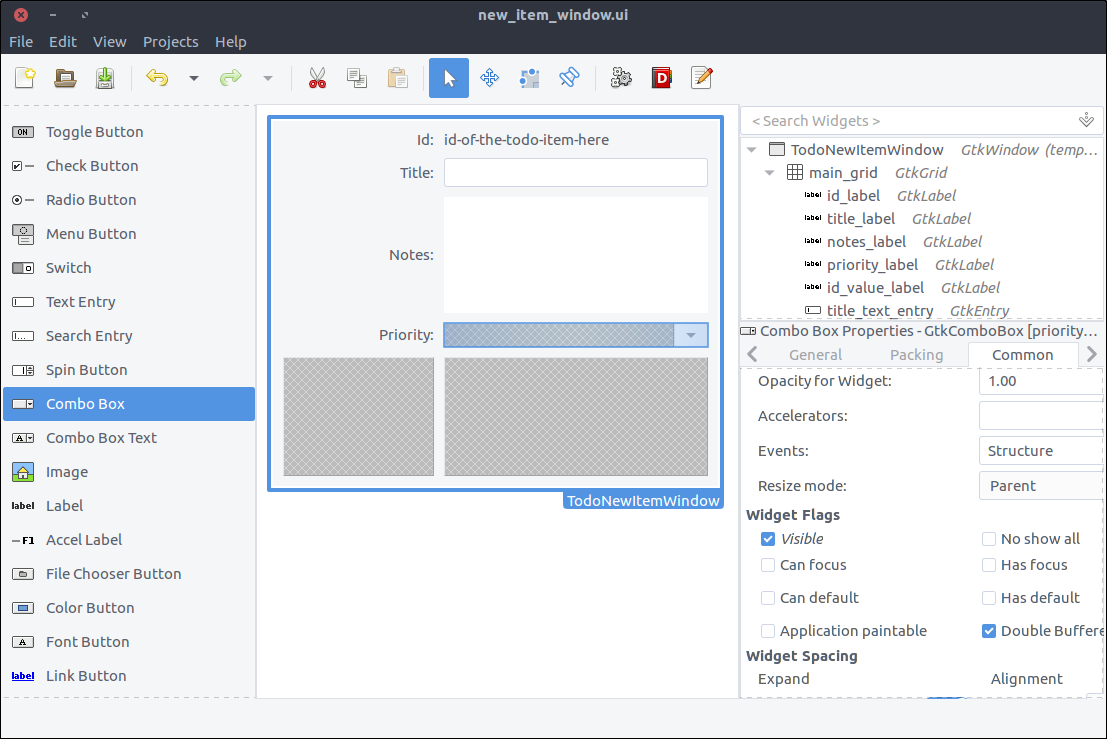
Combo Boxfrom the widget section to the second column of the forth row of the grid. - Set its
IDtopriority_combo_box. - In the Common tab of the properties section, check the
Widget Spacing > Expand > Horizontalcheckbox and turn on the switch which is right next to it. This way, the widget will expand horizontally every time its parent (a.k.a. the grid) is resized. - This widget is actually a drop down element and we are going to populate its values that can be selected by the user when it shows up inside our window class.
- Drag a
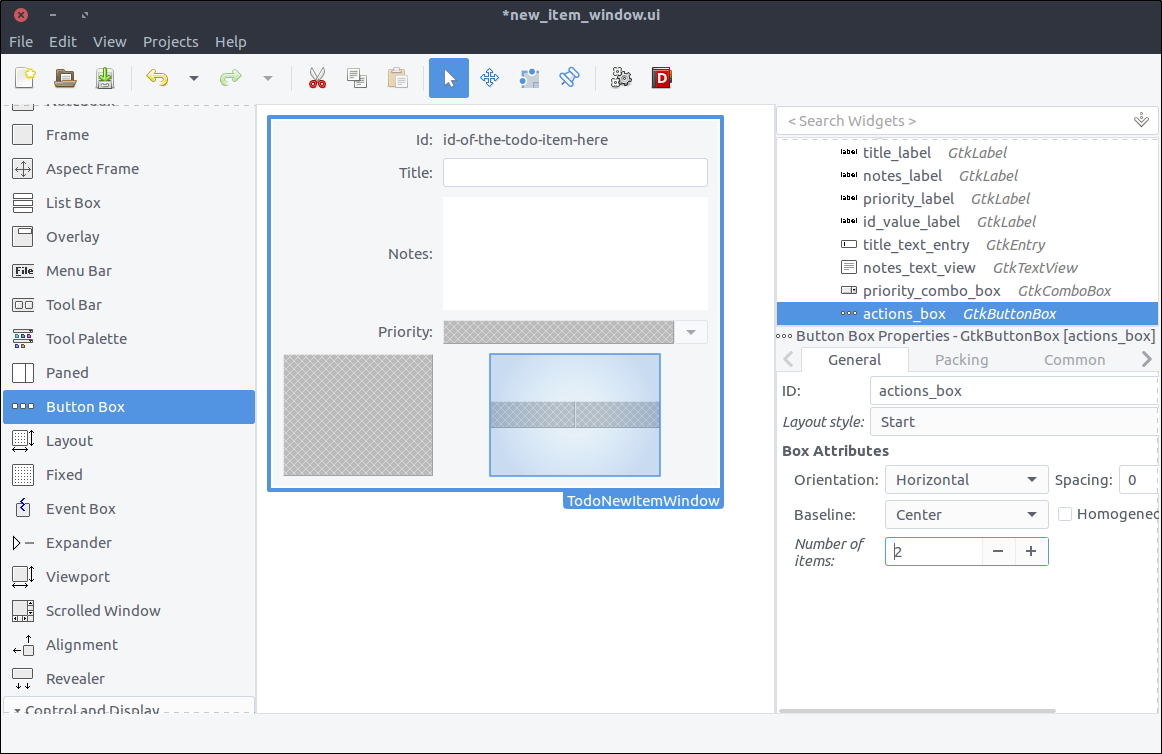
Button Boxfrom the widget section to the second column of the last row of the grid. - On the popped up window select 2 number of items.
- In the General tab of the properties section set the Box Attributes > Orientation property to Horizontal.
- In the General tab of the properties section set the Box Attributes > Spacing property to 10.
- In the Common tab of the properties section set the Widget Spacing > Alignment > Horizontal to Center.
- Again, this widget won’t be altered by our code but you can give it a descriptive
IDfor readability. I named mineactions_box
- Drag a
Buttonwidget twice and place it to each of the two boxes of the button box widget we added in the previous step. - Set their
IDproperties tocancel_button&save_buttonrespectively. - In the General tab of the properties window, set their Button Content > Label with option image property to Cancel and Save respectively.
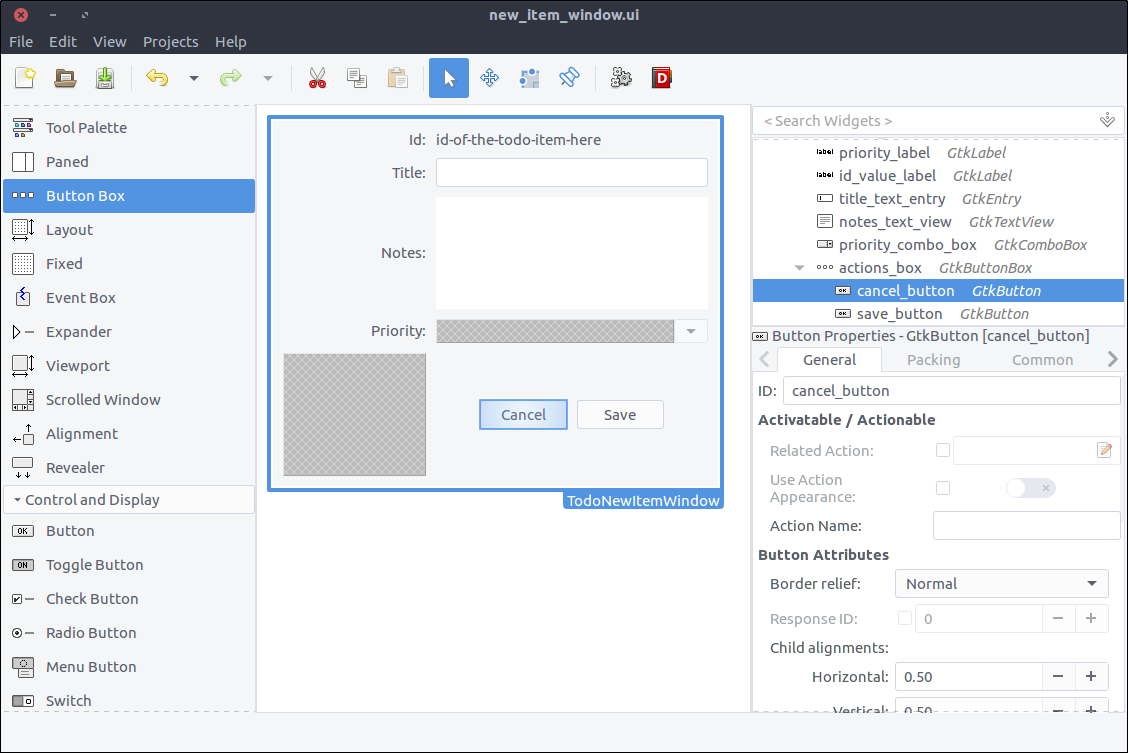
The window is ready. Save the file under resources/ui/new_item_window.ui.
Time to port it in our application.
Implement the new item window class
Before implementing the new class, we must update our GResource description file a.k.a. resources/gresources.xml to obtain the new resource:
<?xml version="1.0" encoding="UTF-8"?>
<gresources>
  <gresource prefix="/com/iridakos/gtk-todo">
    <file preprocess="xml-stripblanks">ui/application_window.ui</file>
    <file preprocess="xml-stripblanks">ui/new_item_window.ui</file>
  </gresource>
</gresources>
Now we can create the new window class. Create a file under application/ui/todo named new_item_window.rb and set its contents as follows.
module Todo
  class NewItemWindow < Gtk::Window
    # Register the class in the GLib world
    type_register

    class << self
      def init
        # Set the template from the resources binary
        set_template resource: '/com/iridakos/gtk-todo/ui/new_item_window.ui'
      end
    end

    def initialize(application)
      super application: application
    end
  end
end
Nothing special here. We just changed the template resource to point to the correct file of our resources.
We have to change the add_new_item_button code that executes on the clicked signal to show the new item window.
Go ahead and change that code in application_window.rb to this:
add_new_item_button.signal_connect 'clicked' do |button|
  new_item_window = NewItemWindow.new(application)
  new_item_window.present
end
Let’s see what we have done. Start the application and click on the Add new item button. Ta daaaaaaa
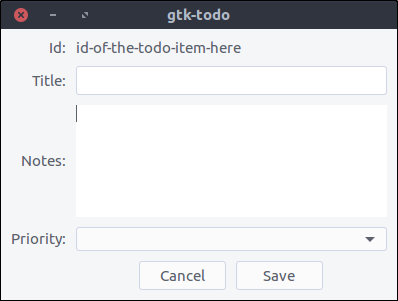
Of course, nothing happens when pressing the buttons. We will change that.
First we will bind the ui widgets in the Todo::NewItemWindow class.
Change the init method the to this:
def init
  # Set the template from the resources binary
  set_template resource: '/com/iridakos/gtk-todo/ui/new_item_window.ui'

  # Bind the window's widgets
  bind_template_child 'id_value_label'
  bind_template_child 'title_text_entry'
  bind_template_child 'notes_text_view'
  bind_template_child 'priority_combo_box'
  bind_template_child 'cancel_button'
  bind_template_child 'save_button'
end
This window is going to be shown either when creating a new Todo item or editing an existing one. Thus the new_item_window naming is not very valid. This was intentional though so that we refactor the code later (No it was not :D I made a mistake when writing the tutorial. In any case, we’ll refactor later on).
For now, we will update the initialize method of the window to require one extra parameter, the Todo::Item to be created or edited. We can then set a more meaningful window title and change the children widgets to reflect the current item.
Change the initialize method to this:
def initialize(application, item)
  super application: application
  set_title "ToDo item #{item.id} - #{item.is_new? ? 'Create' : 'Edit' } Mode"

  id_value_label.text = item.id
  title_text_entry.text = item.title if item.title
  notes_text_view.buffer.text = item.notes if item.notes

  # Configure the combo box
  model = Gtk::ListStore.new(String)
  Todo::Item::PRIORITIES.each do |priority|
    iterator = model.append
    iterator[0] = priority
  end

  priority_combo_box.model = model
  renderer = Gtk::CellRendererText.new
  priority_combo_box.pack_start(renderer, true)
  priority_combo_box.set_attributes(renderer, "text" => 0)

  priority_combo_box.set_active(Todo::Item::PRIORITIES.index(item.priority)) if item.priority
end
and add the constant PRIORITIES in the application/models/item.rb file just below the PROPERTIES constant as:
PRIORITIES = ['high', 'medium', 'normal', 'low'].freeze
What did we do here?
- We set the window’s title to a string containing the id of the current item and the mode depending on whether the item is now being created or edited.
- We set the
id_value_labeltext to display the current item’s id. - We set the
title_text_entrytext to display the current item’s title. - We set the
notes_text_viewtext to display the current item’s notes. - We create a model for the
priority_combo_boxwhose entries are going to have only oneStringvalue. At a first sight, aGtk::ListStoremodel might look a little confusing. I will try to explain how it works now.- Suppose we want to display in a combo box a list of country codes and their respective country names.
- We would create a
Gtk::ListStoredefining that its entries would consist of two string values: one for the country code and one for the country name. Thus we would initialize the ListStore as:model = Gtk::ListStore.new(String, String) - In order to fill the model with data we would do something like this (make sure you don’t miss the comments in the snippet):
[['gr', 'Greece'], ['jp','Japan'], ['nl', 'Netherlands']].each do |country_pair| entry = model.append # Each entry has two string positions since that's how we initialized the Gtk::ListStore # Store the country code in position 0 entry[0] = country_pair[0] # Store the country name in position 1 entry[1] = country_pair[1] end - We also had to configure the combo box to render two text columns/cells (again, make sure you don’t miss the comments in the snippet):
country_code_renderer = Gtk::CellRendererText.new # Add the first renderer combo.pack_start(country_code_renderer, true) # Use the value in index 0 of each model entry a.k.a. the country code combo.set_attributes(country_code_renderer, 'text' => 0) country_name_renderer = Gtk::CellRendererText.new # Add the second renderer combo.pack_start(country_name_renderer, true) # Use the value in index 1 of each model entry a.k.a. the country name combo.set_attributes(country_name_renderer, 'text' => 1) - I hope I made it a little more clearer…
- We add a simple text renderer in the combo box and instruct it to display the one and only value of each model’s entry (a.k.a. position
0). Imagine that our model is something like[['high'],['medium'],['normal'],['low']]and0is actually the first element of each sub-array. I will stop with the model-combo-text-renderer explanations now…
Configure the user data path
Remember that when initializing a new Todo::Item (not an existing one) we had to define a :user_data_path in which it would be saved. We are going to resolve this path when the application starts and make it accessible from all the widgets.
All we have to do is check if the .gtk-todo-tutorial path exists inside the user’s home ~ directory. If not, then we will create it. Then we set this as an instance variable of the application. All widgets have access to the application instance. Sooooo….all widgets have access to this user path variable.
Change the application/application.rb file to this:
module ToDo
  class Application < Gtk::Application
    attr_reader :user_data_path

    def initialize
      super 'com.iridakos.gtk-todo', Gio::ApplicationFlags::FLAGS_NONE

      @user_data_path = File.expand_path('~/.gtk-todo-tutorial')
      unless File.directory?(@user_data_path)
        puts "First run. Creating user's application path: #{@user_data_path}"
        FileUtils.mkdir_p(@user_data_path)
      end

      signal_connect :activate do |application|
        window = Todo::ApplicationWindow.new(application)
        window.present
      end
    end
  end
end
One last thing that we have to do before testing what we have done so far is to instantiate the Todo::NewItemWindow when the add_new_item_button is clicked complying with the changes we made a.k.a. change the code in application_window.rb to this:
add_new_item_button.signal_connect 'clicked' do |button|
  new_item_window = NewItemWindow.new(application, Todo::Item.new(user_data_path: application.user_data_path))
  new_item_window.present
end
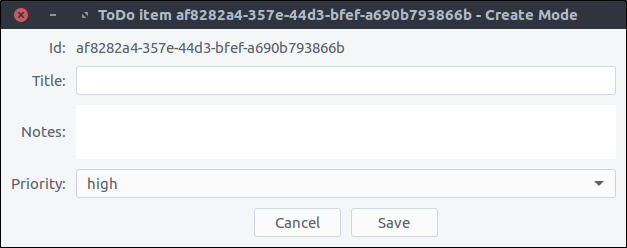
Start the application and click on the Add new item button. Ta daaaaaa (note the - Create mode part in the title).
Cancel the item creation/update
In order to close the Todo::NewItemWindow window when user clicks the cancel_button all we have to do is to add this to the window’s initialize method:
cancel_button.signal_connect 'clicked' do |button|
  close
end
close is an instance method of the Gtk::Window class that surprisingly enough closes the window.
Save the item
Saving an item involves two steps:
- Update the item’s properties based on the widgets’ values
- Call the
save!method on theTodo::Iteminstance
Again, our code will be placed in the initialie method of the Todo::NewItemWindow:
save_button.signal_connect 'clicked' do |button|
  item.title = title_text_entry.text
  item.notes = notes_text_view.buffer.text
  item.priority = priority_combo_box.active_iter.get_value(0) if priority_combo_box.active_iter
  item.save!
  close
end
Note that we again close the window after saving the item.
Let’s try that out.
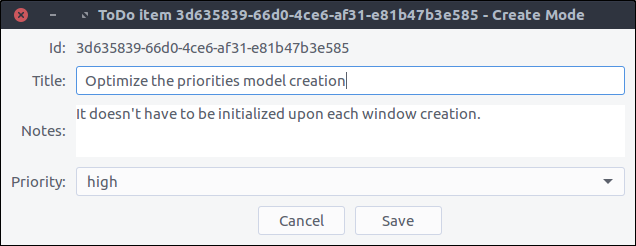
Pressing save and navigating to your ~/.gtk-todo-tutorial folder you should see a file there. Mine had the following contents:
{
	"id": "3d635839-66d0-4ce6-af31-e81b47b3e585",
	"title": "Optimize the priorities model creation",
	"notes": "It doesn't have to be initialized upon each window creation.",
	"priority": "high",
	"filename": "/home/iridakos/.gtk-todo-tutorial/3d635839-66d0-4ce6-af31-e81b47b3e585.json",
	"creation_datetime": "2018-01-25 18:09:51 +0200"
}
Don’t forget to try out the cancel button as well.
Awesome!!!
View ToDo items
We have left the Todo::ApplicationWindow to contain only one button. Time to change that.
We want the window to have the Add new item on the top but below it there should be a list with all of our todo items.
To accomplish that we are going to add a Gtk::ListBox in our design which can contain any number of rows.
Update the application window
- Open the
resources/ui/application_window.uifile in Glade. - If you try to drag a
List Boxwidget from the widget section directly on the window nothing happens. That is normal. First we have to split the window in two parts. One part for the button and one for the list box. Bear with me. - Right click on the
new_item_windowin the hierarchy section and select Add parent > Box. - In the popped up window, set that you need 2 items.
- The orientation of the box is already vertical so we are fine.
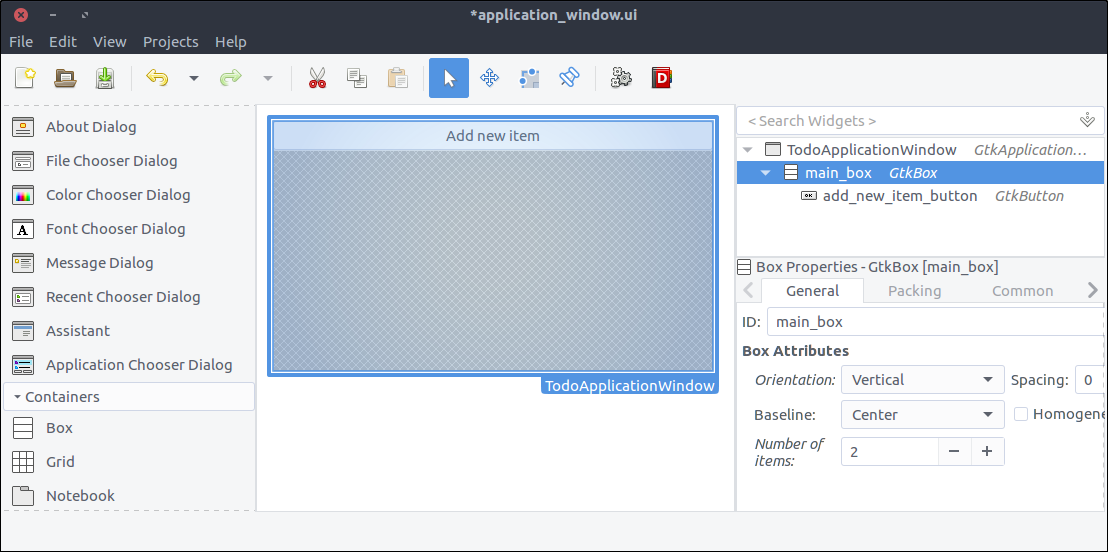
- Now, drag a
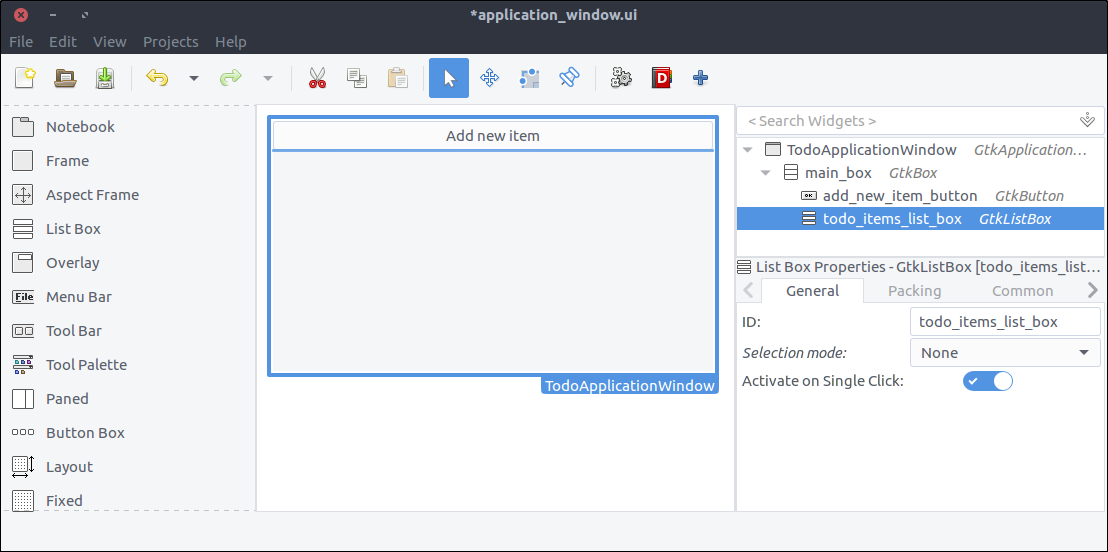
List Boxand place it on the free are of the previously added box. - Set its
IDproperty totodo_items_list_box - Set is
Selection modetoNonesince we won’t provide such a functionality.
Design the ToDo item list box row
Each row of the list box that we created in the previous step is going to be more complex than a row of text. It is going to contain widgets that will allow the user to expand an item’s notes, and to delete or edit the item.
- Create a new project in Glade as we did for the
new_item_window.ui. Save it underresources/ui/todo_item_list_box_row.ui. - Unfortunately, at least in my version of Glade, there is no
List Box Rowwidget in the widget section so in order to add one directly as the top level widget of our project, we will do it in a kinda hackish way. - Drag a
List Boxfrom the widget section to the design area. - Inside the hierarchy section right click on the
List Boxand selectAdd Row
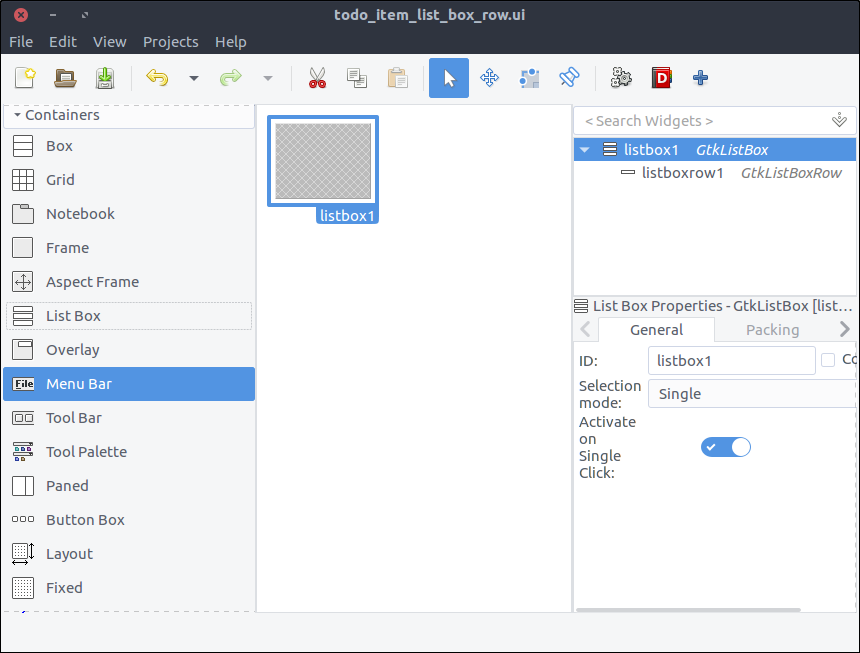
- Inside the hierarchy section right click on the newly added
List Box Rowwhich is nested under theList Boxand selectRemove parent. There it is. TheList Box Rowis the top level widget of the project now.
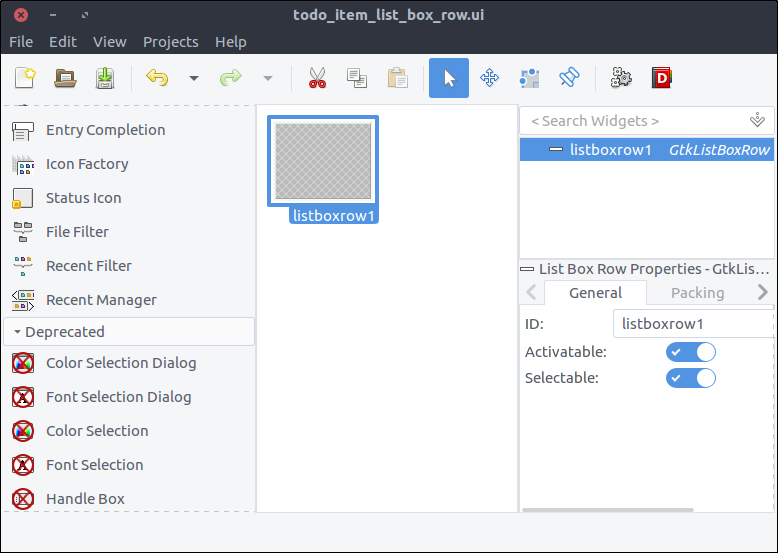
- Check the widget’s
Compositeproperty and set its name toTodoItemListBoxRow. - Drag a
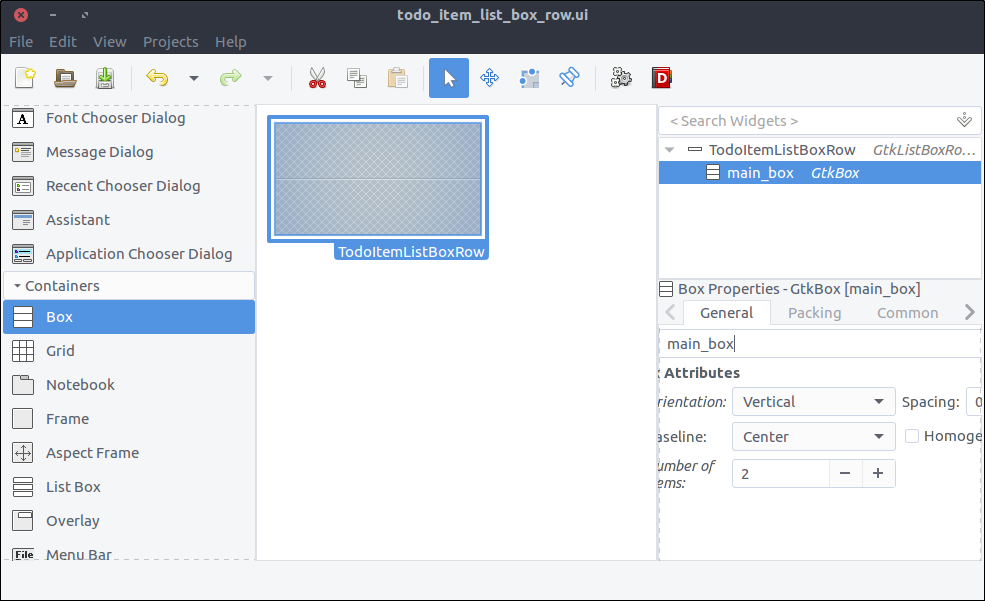
Boxfrom the widget section to the design area inside ourList Box Row. - Set 2 items in the popped up window.
- Set its
IDproperty tomain_box
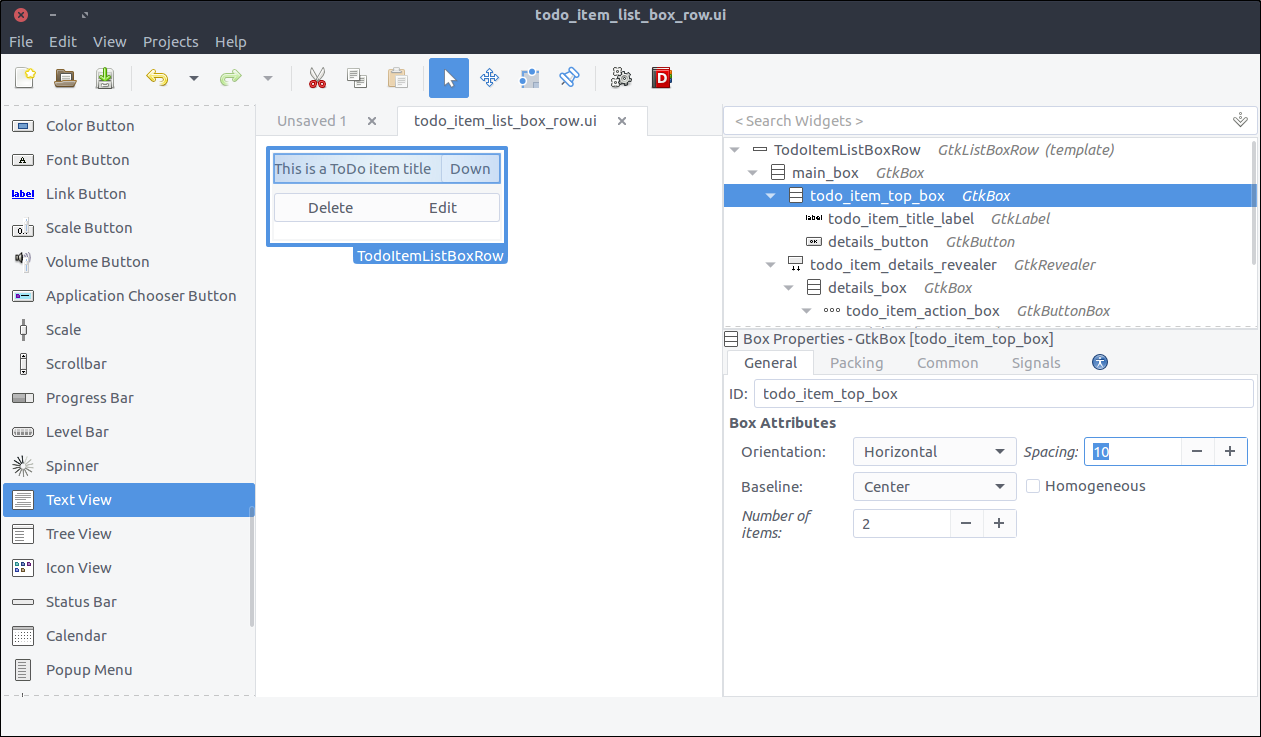
- Drag another
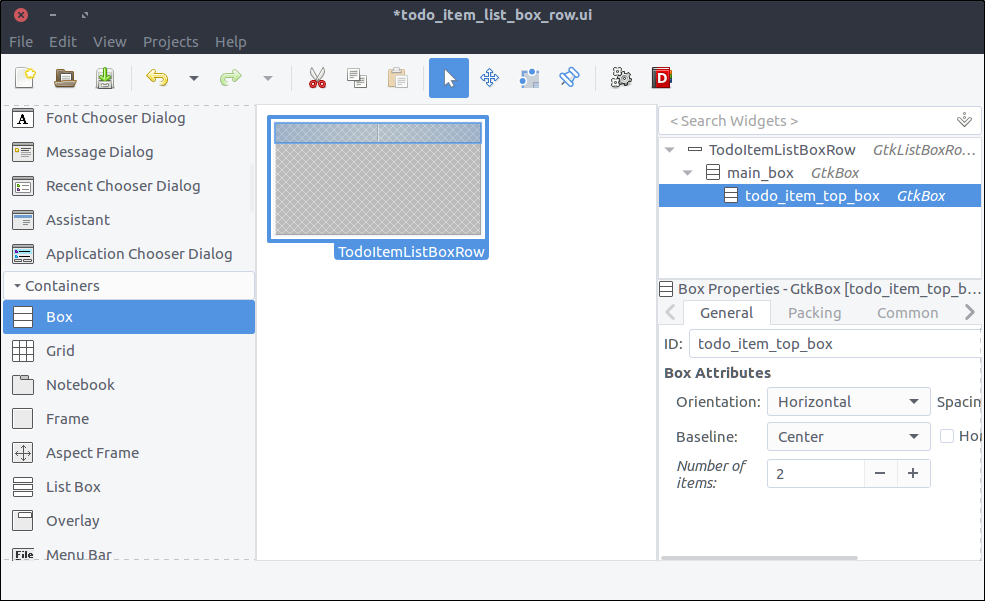
Boxfrom the widget section to the first row of the previously added box. - Set 2 items in the popped up window.
- Set its
IDproperty totodo_item_top_box. - Set its Orientation property to Horizontal.
- Set its
Spacing(General tab) property to 10.
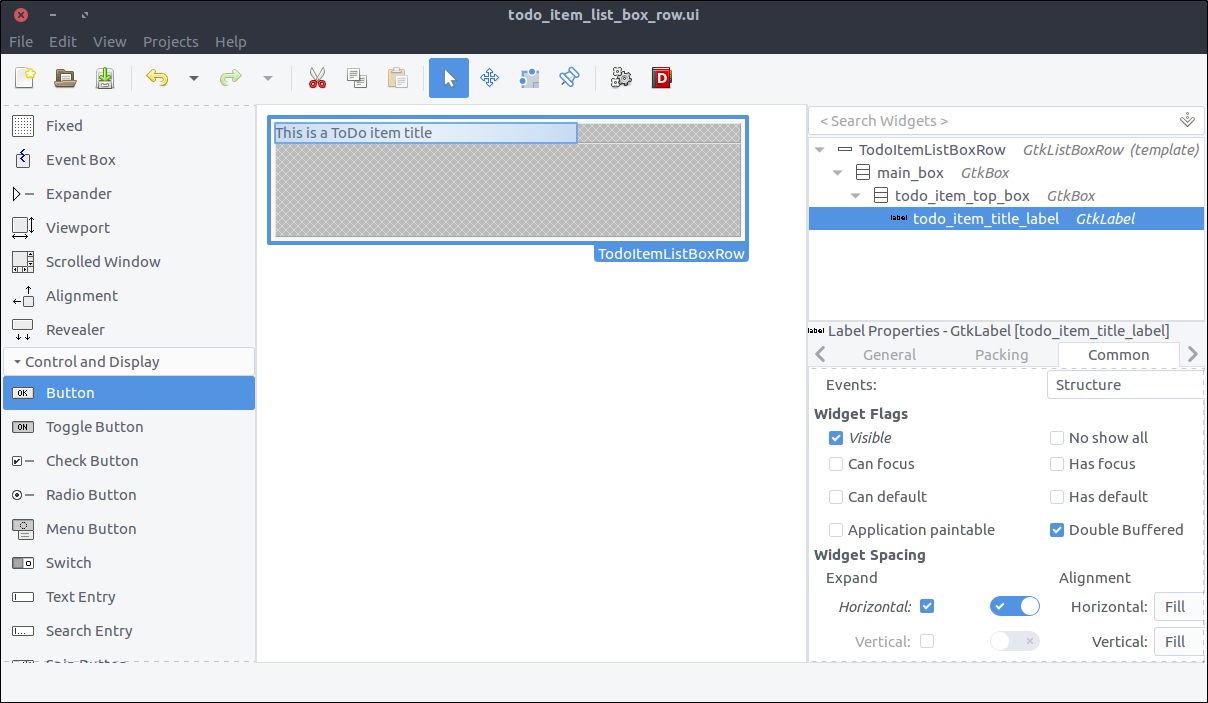
- Drag a
Labelfrom the widget section to the first column of thetodo_item_top_box. - Set its
IDproperty totodo_item_title_label. - Set its Alignment and Padding > Alignment > Horizontal property to 0.00.
- In the Common tab of the properties section, check the Widget Spacing > Expand > Horizontal checkbox and turn on the switch which is right next to it so that the label expands to available space.
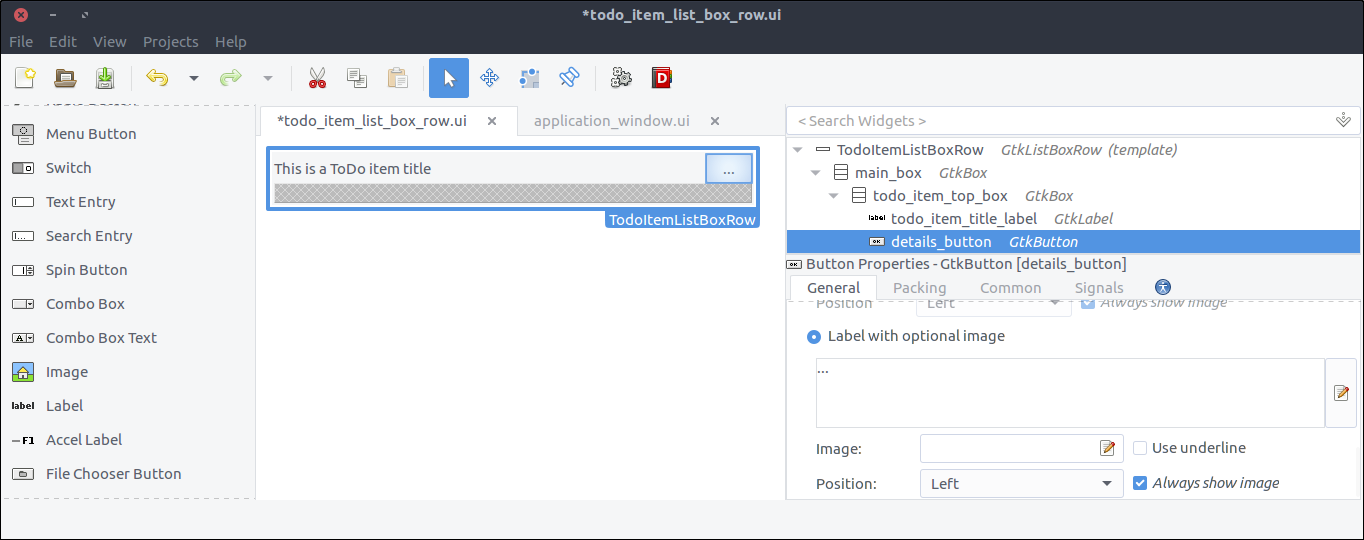
- Drag a
Buttonfrom the widget section to the second column of thetodo_item_top_box. - Set its
IDproperty todetails_button - Check the Button Content > Label with optional image radio and type
...(three dots).
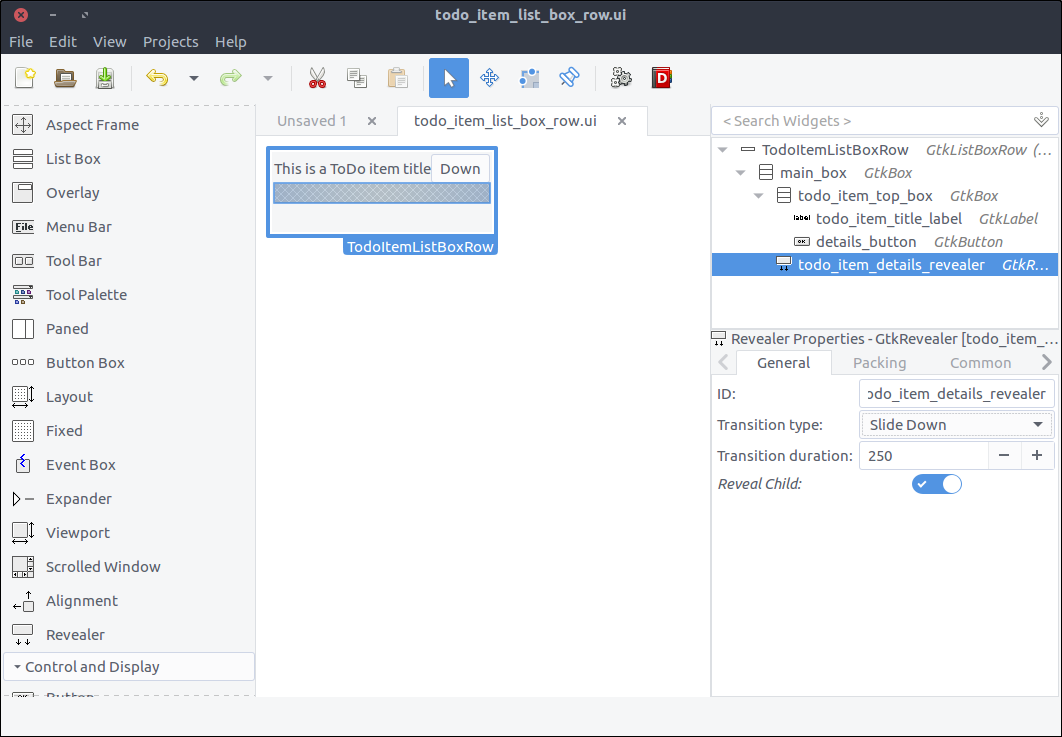
- Drag a
Revealerwidget from the widget section to the second row of themain_box. - Turn off the
Reveal Childswitch in the General tab. - Set its
IDproperty totodo_item_details_revealer. - Set its
Transition typeproperty toSlide Down.
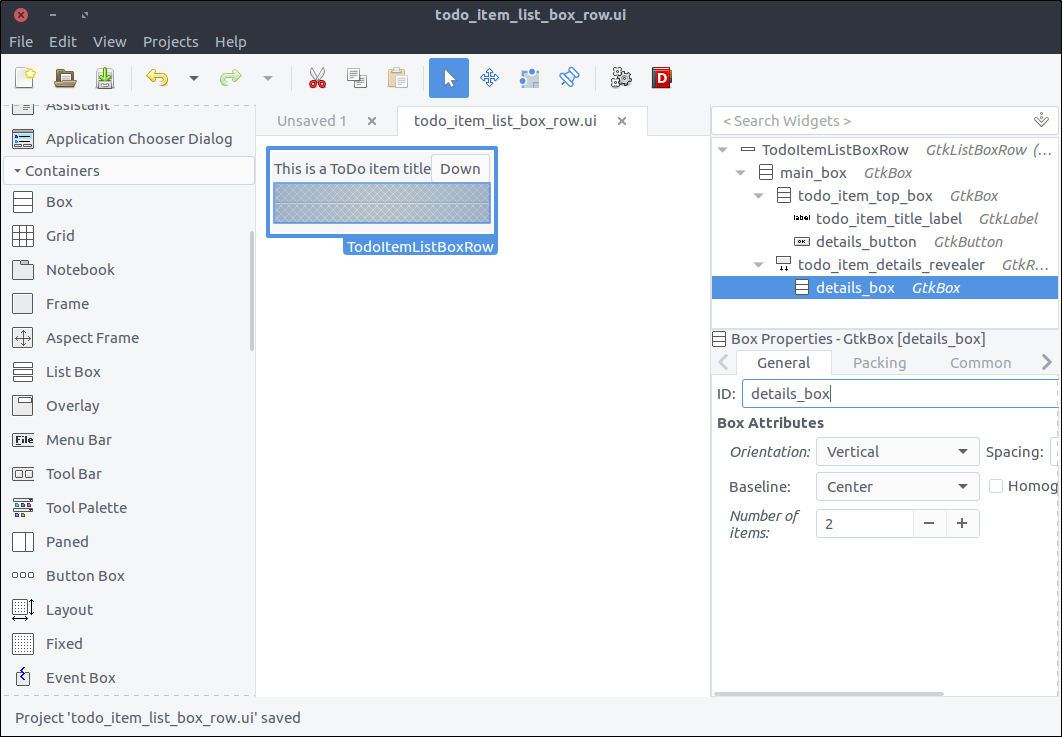
- Drag a
Boxfrom the widget section to the reveal space. - Set its items to 2 in the popped up window.
- Set its
IDproperty todetails_box. - In the Common tab, set its Widget Spacing > Margins > Top property to 10.
- Drag a
Button Boxfrom the widget section to the first row of thedetails_box. - Set its
IDproperty totodo_item_action_box. - Set its
Layout styleproperty toexpand.
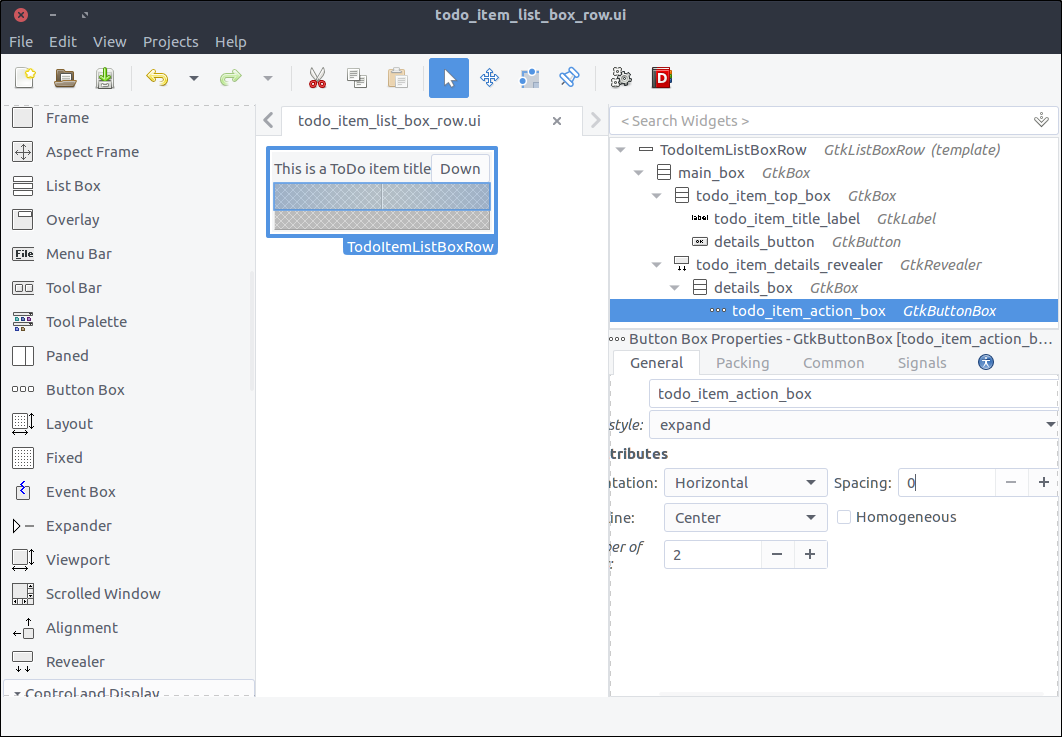
- Drag two
Buttonwidgets to the first and second column of thetodo_item_action_boxrespectively. - Set their
IDproperties todelete_buttonandedit_buttonrespectively. - Set their Button Content > Label with optional image properties to
DeleteandEditrespective.
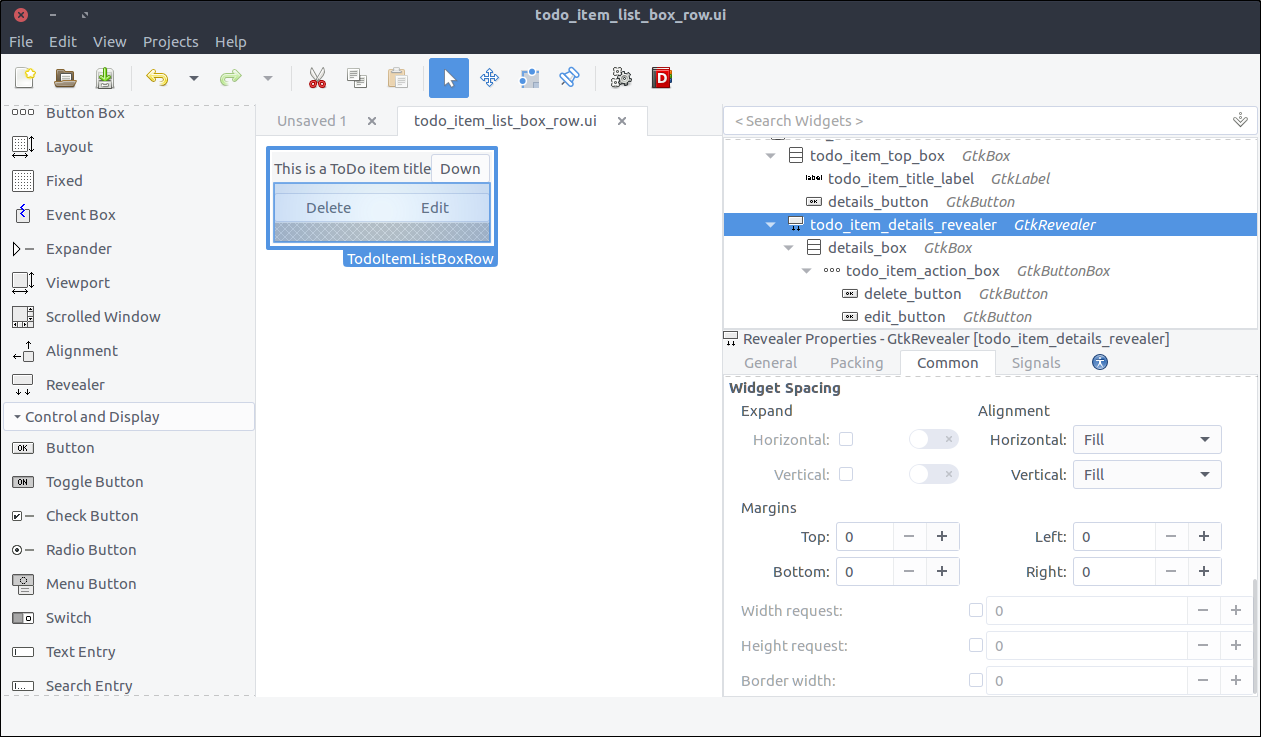
- Drag a
Viewportwidget from the widget section to the second row of thedetails_box. - Set its
IDproperty totodo_action_notes_viewport. - Drag a
Text Viewwidget from the widget section to thetodo_action_notes_viewportthat we just added. - Set is
IDtotodo_item_notes_text_view. - Uncheck its
Editableproperty in theGeneraltab of the properties section.
Create the ToDo item list box row class
Now we will create the class reflecting the user interface of the list box row which we just created.
First we have to update our GResource description file to include the newly created design. Change the resources/gresources.xml file as follows:
<?xml version="1.0" encoding="UTF-8"?>
<gresources>
  <gresource prefix="/com/iridakos/gtk-todo">
    <file preprocess="xml-stripblanks">ui/application_window.ui</file>
    <file preprocess="xml-stripblanks">ui/new_item_window.ui</file>
    <file preprocess="xml-stripblanks">ui/todo_item_list_box_row.ui</file>
  </gresource>
</gresources>
Create a file named item_list_box_row.rb inside the application/ui folder and add the following content.
module Todo
  class ItemListBoxRow < Gtk::ListBoxRow
    type_register

    class << self
      def init
        set_template resource: '/com/iridakos/gtk-todo/ui/todo_item_list_box_row.ui'
      end
    end

    def initialize(item)
      super()
    end
  end
end
We will not bind any children at the moment here.
When starting the application, we have to search for files in the :user_data_path and for each file we must create a Todo::Item instance. For each instance, we must also add a new Todo::ItemListBoxRow to the Todo::ApplicationWindow’s todo_items_list_box list box. One thing at a time.
First of all, let’s bind the todo_items_list_box in the Todo::ApplicationWindow class. Change the init method as follows:
def init
  # Set the template from the resources binary
  set_template resource: '/com/iridakos/gtk-todo/ui/application_window.ui'

  bind_template_child 'add_new_item_button'
  bind_template_child 'todo_items_list_box'
end
Next, we will add an instance method in the same class that will be responsible to load the todo list items in the related list box.
Add this code in Todo::ApplicationWindow.
def load_todo_items
  todo_items_list_box.children.each { |child| todo_items_list_box.remove child }

  json_files = Dir[File.join(File.expand_path(application.user_data_path), '*.json')]
  items = json_files.map{ |filename| Todo::Item.new(filename: filename) }

  items.each do |item|
    todo_items_list_box.add Todo::ItemListBoxRow.new(item)
  end
end
and then call this method at the end of the initialize method.
def initialize(application)
  super application: application

  set_title 'GTK+ Simple ToDo'

  add_new_item_button.signal_connect 'clicked' do |button|
    new_item_window = NewItemWindow.new(application, Todo::Item.new(user_data_path: application.user_data_path))
    new_item_window.present
  end

  load_todo_items
end
Note: We first make sure we empty the list box of its current children rows and we refill it. This way, we will call this method after saving a Todo::Item via the signal_connect of the save_button of the Todo::NewItemWindow and the parent application window will be reloaded! Here’s the updated code (in application/ui/new_item_window.rb):
save_button.signal_connect 'clicked' do |button|
  item.title = title_text_entry.text
  item.notes = notes_text_view.buffer.text
  item.priority = priority_combo_box.active_iter.get_value(0) if priority_combo_box.active_iter
  item.save!

  close

  # Locate the application window
  application_window = application.windows.find { |w| w.is_a? Todo::ApplicationWindow }
  application_window.load_todo_items
end
Previously, we used this code:
json_files = Dir[File.join(File.expand_path(application.user_data_path), '*.json')]
in order to find all the names of the files that exist in the application user data path with json extension.
Let’s see what we’ve created. Start the application and try adding a new ToDo item. After pressing the Save button you should see the parent Todo::ApplicationWindow being automatically updated with the new item!
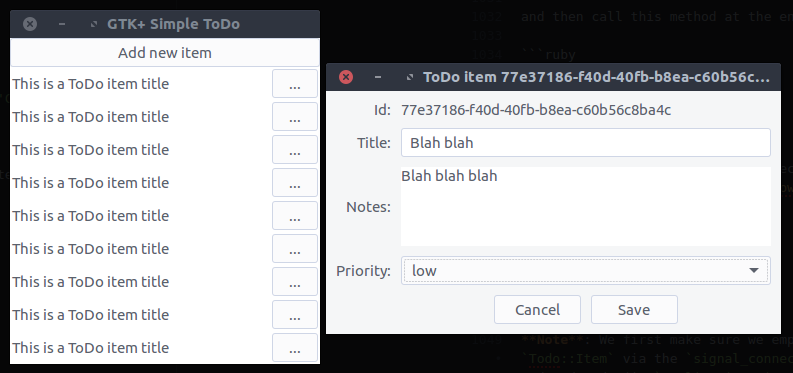
What’s left to do, is to complete the functionality of the Todo::ItemListBoxRow.
We will first bind the widgets. Change the init method of the Todo::ItemListBoxRow class as follows:
def init
  set_template resource: '/com/iridakos/gtk-todo/ui/todo_item_list_box_row.ui'

  bind_template_child 'details_button'
  bind_template_child 'todo_item_title_label'
  bind_template_child 'todo_item_details_revealer'
  bind_template_child 'todo_item_notes_text_view'
  bind_template_child 'delete_button'
  bind_template_child 'edit_button'
end
Then, we are going to setup the widgets based on the item of each row.
def initialize(item)
  super()

  todo_item_title_label.text = item.title || ''

  todo_item_notes_text_view.buffer.text = item.notes

  details_button.signal_connect 'clicked' do
    todo_item_details_revealer.set_reveal_child !todo_item_details_revealer.reveal_child?
  end

  delete_button.signal_connect 'clicked' do
    item.delete!

    # Locate the application window
    application_window = application.windows.find { |w| w.is_a? Todo::ApplicationWindow }
    application_window.load_todo_items
  end

  edit_button.signal_connect 'clicked' do
    new_item_window = NewItemWindow.new(application, item)
    new_item_window.present
  end
end

def application
  parent = self.parent
  parent = parent.parent while !parent.is_a? Gtk::Window
  parent.application
end
- As you can see, when the
details_buttonis clicked, we instruct thetodo_item_details_revealerto swap the visibility of its contents. - After deleting an item, we find the application’s
Todo::ApplicationWindowin order to call itsload_todo_itemsas we did after saving an item. - When clicking to edit a button, we create a new instance of the
Todo::NewItemWindowpassing as item the current item. Works like a charm :D - Finally, we had to reach at the application parent of a list box row so we defined a simple instance method
applicationthat navigates through the widget’s parents until it reaches a window from which it can obtain the application object.
Save and run the application. There it is.
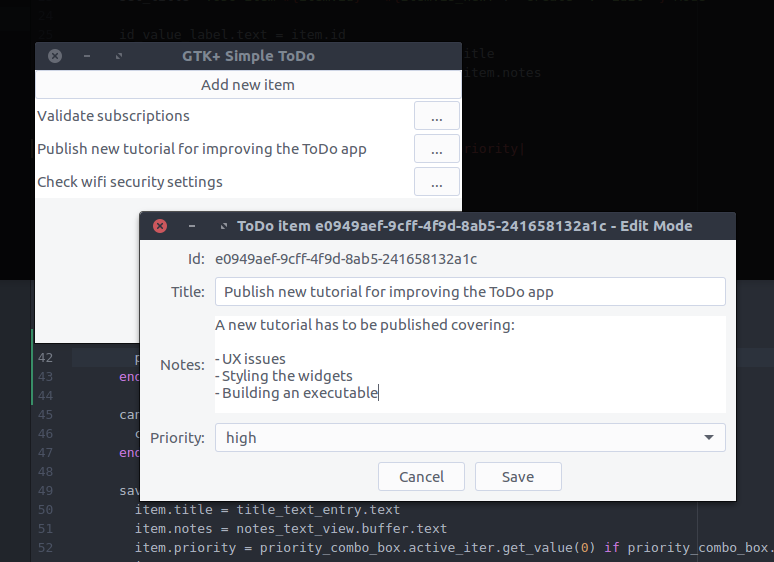
This has been a really long tutorial and even though there are so many items that we haven’t covered I think we better end it here.
Long post, cat photo.

 (
(