If you are new to Ruby I suggest you first read my previous post which in short explains why you should not give up on learning Ruby.
Starting with this post, I’ll be writing some tutorials covering the first steps you could follow in order to get familiar with both the language (Ruby) and the framework (Ruby on Rails). My posts will be based on my own experience so I hope that anyone new here can understand them easily.
First things first, install ruby and rails on your machine. There are plenty of installation tutorials out there from which you can pick the one matching your machine’s operating system. I followed this one in order to install Ruby 2.0 & Rails 4 on OS X Mavericks.
Development environment
You will need:
-
Text editor: I prefer using Sublime Text which is an excellent text editor with many plugins. There are a lot of other options but this is something you don’t have to decide now. Give them a try and you’ll find the one you like the most. Update 2016: I now prefer using GitHub’s Atom editor.
-
Console: I use iTerm2 which is a powerful replacement for OS X’s Terminal application.
-
Browser: Your favorite one. I use firefox (with its firebug & httpfox plugins) for development. Update 2016: I now prefer using Google Chrome with its great development tools
Let’s begin
Create a folder in which you are going to put the tutorial’s code and navigate to it from the command line:
mkdir tutorials
cd tutorials
Now let’s create our new application with the name hello_world:
rails new hello_world
The command above will create a folder with the name hello_world.
Inside this folder you will find various files and subfolders which actually constitute a Rails application.
In this post I will only explain the files/folders to which we are going to make changes on (a thorough explanation will be provided in an upcoming one).
You already have a web server installed in your system that comes bundled with Ruby and its name is WEBRick. Let’s start it to see what we have created by the last command.
From the command line, navigate to the created folder:
cd hello_world
Start WEBrick with the following command:
rails server
You can also use s instead of server in the previous command which is just an alias and will do the exact same thing:
rails s
You should see something similar to this:
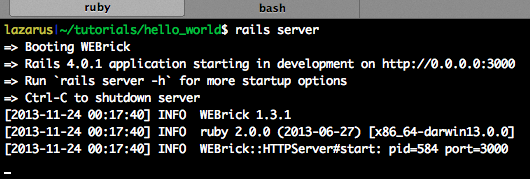
By default, the server listens to port 3000 but you may change to the one you desire by using the -p option:
rails server -p 8080
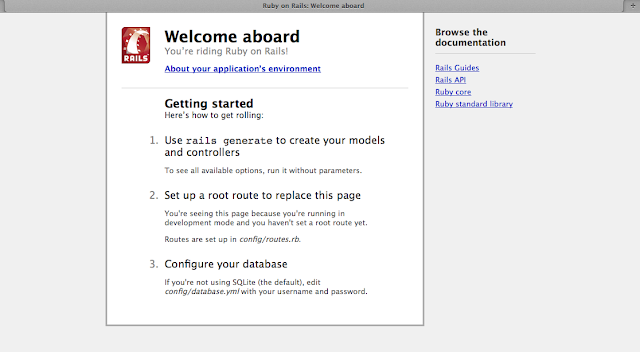
So, the web server started and our application is successfully deployed. Open your browser and visit the following address:
http://localhost:8080
Tadaaa… You should see something like this:
Before we continue, I will try to explain in a simple way how a rails application works.
- Every request to the application is served by methods (called
actions) which are defined in special files calledcontrollers. - These actions execute what has to be executed and define what the response will be (for example an html page, a JSON object etc). The responses (e.x. a page) are defined in special files called views but there are cases (such as when responding with a JSON object) that an action’s view is not required to be defined.
- The rules (
routes) that define which action of which controller will serve each request are placed in a special file calledroutes.rb
These are enough for the time being. Let’s create our first controller named pages.
From the command line:
rails generate controller pages
You will see a bunch of lines coming out from this command but focus on the first one:
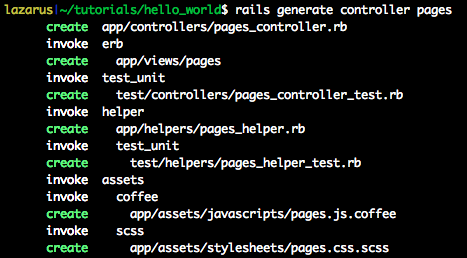
Yes, pages_controller.rb is our controller.
In this file we are going to create our action that will serve the “root” (home) request to our application.
So, open this file with your text editor. Its location is:
app/controllers/pages_controller.rb
As you can see, the controller is empty. We will add an action to it, let’s call it home:
def home
end
As you can see, our action does nothing since all we want to do is show a static page with text Hello world. Let’s add something though just to see it being executed from the server’s log:
class PagesController < ApplicationController
  def home
    puts "Honey, I'm home!"
  end
end
If you speak Java, puts is similar to Java’s System.out.println();
If not told otherwise (which is our case), the home action will try to respond with a view named home too.
So let’s create this view in the appropriate folder which is:
app/views/pages/
Create a file in this folder with the name home.html.erb
The erb extension implies that this file will be processed by Rails in order to embed any dynamic content.
Edit this file and add:
<h1>Hello world!</h1>
What’s left? Yes, we must route the root requests to our controller’s action.
Open with your text editor the routes.rb file which is located here:
config/routes.rb
You will find a bunch of help comments (text starting with #) there which you can delete.
Now, add the following line which tells that the root path / will be served by our controller’s home action:
root to: 'pages#home'
If you refresh your browser, you will see the amazing and super complex page we just created:

We could stop here but it would be nice if we had the Hello world! text being passed to the view from the controller’s action, yes? Yes.
Open the pages controller again and change the home action:
def home
  @greeting = "Home action says: Hello world!"
end
Here, we declared an instance variable to our controller with name greeting and value Home action says: Hello world!.
This variable is available for use from our corresponding view so open the home.html.erb view and change its contents to the following:
<h1><%= @greeting %></h1>
Refresh the page in your browser and there it is:

There, you just created your first Ruby on Rails application!
What’s next? How about creating a simple ToDo application?
 (
(